Shelf Candy

Styling my new floor-to-ceiling bookcase is an ongoing project right now- that's a lot of surface to style apparently.  I'm shopping the house for books and accessories and no surface is safe!  Most likely I'll need to restyle every surface in the house once the bookcase is set, since I'll be stealing accessories from almost every vignette.  Sounds like a terrible problem and no fun at all to solve.  No fun at all. With a new bookcase with unlimited styling potential, I've also been noticing new books that I'd like to add to the shelf.

Design Book roundup


1// A Life Less Ordinary by Alex Legendre & Zoe Ellison

2// The Flower Recipe Book by Alethea Harampolis

3// Elements of Style by Erin Gates

4// Vintage Modern Style by Emily Chalmers

5// The Nesting Place by Myquillyn Smith

6// Design Sponge at Home by Grace Bonney

7// Paper to Petal by Rebecca Thuss & Patrick Farrell


I'd love to hear your design/decor book recommendations!


Monday Ramblings

Another 30 before 30 check- Weekend ski trip with Hubby!  And I have the sore legs to prove it. I am not a skiier.  Hubby is.  I had only been skiing 3 times ever, the last being over 8 years ago, and never had a lesson...I was shaky to say the least.  After starting the weekend with a beginner class and pretty confident that I'd stick to the bottom half of the mountain all weekend, somehow I found myself at the peak on day 2 after much encouragement from friends.  Holy cow was the view amazing!

stratton-top

I only had one minor panic of "crap this is high and that hill is steep" on the way down.  I would've even gone up again if we had had more time.  I doubt I'll suddenly become a skiier, but I told Hubby I'd be happy to make it a yearly thing.

And now that I'm back to reality, it's apparently St. Patty's Day today! Which is fitting because with spring so close I can taste it, I just want to prance around in a pretty green dress.  Of course currently my legs don't have enough mobility for prancing, and I don't own a green dress, but if I could and did, I WOULD!  Take a moment to see the image in my head- me in a pretty green flowy dress, prancing around my latest flip/construction site.  I'll start a new trend of Glam Demolition!  Every dress should be accessorized with a sledge hammer.

Speaking of the latest flip, I'm digging my hands in today!  I'll be taking proper before pics and sharing them this Friday.  First thing to be demo-ed: these 2 fake hardwood laminate floors adjacent to real hardwood floors.  I'm pretty sure that some of this laminate is even covering original hardwood floors.  Blasphemy!

laminate-floors-grover

I can already tell you the afters in a few months will be stunning!!!

Have a great week!


Copper Shopping (list)

Let's check another item off of my DIY teaser list.  A while back, I told you I had a DIY planned with this receipt tape. receipt paper to diy

Well, it's finally put to good use as a shopping list!

diy copper wood shopping list

I've seen this in my head for so long, I'm glad to get it out and into reality.

I used a block of wood, receipt paper, 2 sizes of copper pipe, and screws.  You don't get much simpler, I swear!

diy copper wood shopping list pieces

I decided to start from the bottom and work my way up.  To do the bottom piece that will hold the paper, I flattened out a portion of pipe.  I found the best way to get a smooth surface was the put the pipe between to blocks and hammer it that way.

flatten copper

With a flat-ish piece accomplished, instead of cutting it to length, I bent it until it broke in the intended spot.

Next was to bend it around the wood to the desired shape.  I used a scrap piece of wood to bend this around so that if I made any mistakes I wouldn't damage the finished stained piece.

wood blocks

Isn't that a sexy backdrop?  I'm innovative, huh?  (the paper towel was originally for the stained piece to make sure it was dry, and I figured it shouldn't go to waste)  .... SO... to bend the copper without denting it, I clamped it in the desired spot with another block of wood, then bent the ends around the wood.

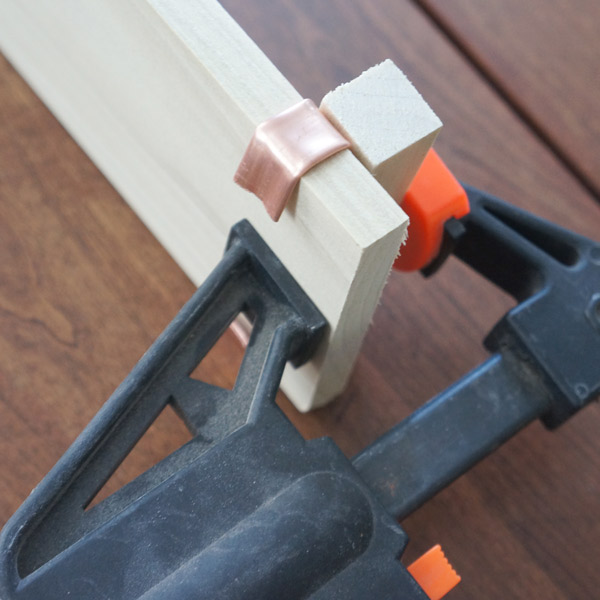
clamped copper front clamped copper

The upper piece was slightly trickier to bend because it took me holding the roll of paper in place.

list progress

I couldn't clamp this one because the roll would deform, so I had to hold with one hand and bend the piece around the wood with the other.  I'm just DIYing until my hand-modeling career takes off.  Man hands are the next rage.

On the front where I hadn't flattened the pipe, I used a hack saw to cut it to length- being very careful not to push too hard and deform the copper.

copper cut

I repeated the last few steps with a smaller piece of copper for the other side.

copper wood cut pieces

Then came assembly- always the best part!  I drilled holes in the copper where the screws would go, then attached the pieces where desired.  The back ends up being less than pretty, but since that'll be up against my cabinet door, it doesn't matter.

copper wood shopping list back

I'm using my favorite mounting method- 3m's re-positionable picture hangers so I can take the list down when I need to replace the receipt roll.

diy copper wood list

It'll actually be pretty simple when I need to replace a roll.  See how on the right, the smaller tube goes into the larger?  I'll just need to unscrew the smaller tube from the back and remove it, switch out the paper roll, then rescrew the small tube back in place.

diy copper wood list cabinet

Have you ever seen a sexier shopping list??  Methinks not!

