Home repair

Carpet Adieu

Keeping projects that I'm working on under wraps is not my forte.  If you follow me on social media, you have more than an inkling what I've been up to the past few days.  Hint: it has to do with floors. hall-floor1

After 4 1/2 long years of grumbling about the wall to wall carpet in our upstairs rooms, we're finally doing something about it!  I'm not the biggest wall to wall carpet fan.  It has it's place sometimes, but in general it kinda weirds me out.  No matter how much you clean or vacuum it, it absorbs dust and, stains and dirt from the houses previous owners still linger.  Especially when you have a textured loop like was in my office and the hallway- it was like velcro for dirt.  Ick.

carpet-halo

I'd much prefer to live with hard wood floors with area rugs.  Not only are area rugs MUCH easier to give a deep clean to, they're also much easier to switch out when you want to give a new look to the space.  *steps off soap box*

In the past I've always tried to show you as little of the upstairs carpet as possible.  Between the bedroom, hallway, and 2 tiny offices, there was 3 different beige stained carpets that we planned to do away with from the moment we put an offer in on the house.  Some stains we inherited with the house, others are from a cat with a very sensitive tummy who also enjoyed using the carpet as a scratcher.  He's lucky he's cute and fluffly.

bear-carpet

But back to the floor.  Probably 50 years ago, the then owners decided it would be a great idea to put plywood and then the carpet pad and carpet over the original wide plank pine boards.  Silly homeowners.

carpet-pad-bye

plywood-removal

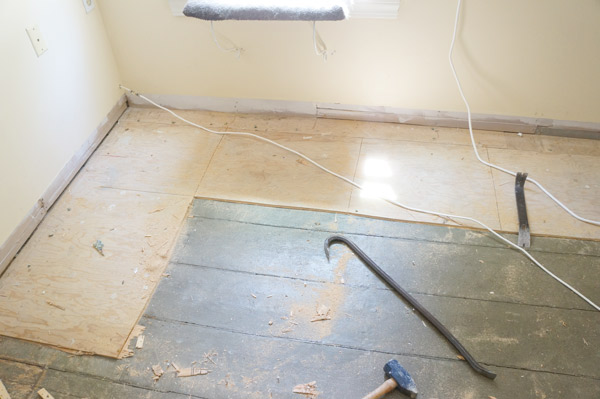
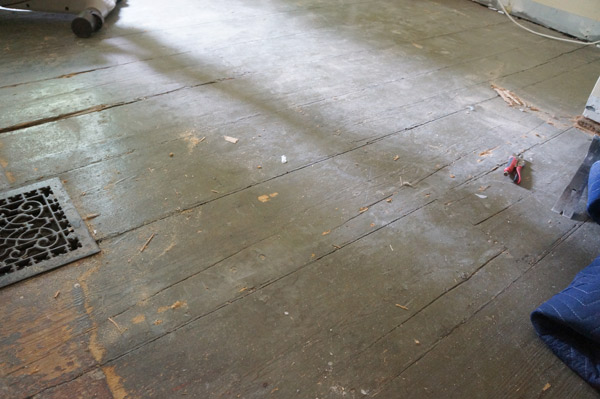
It's looking pretty promising that we'll be able to save the original 115 year old wide plank pine and as you can imagine, I'm cautiously giddy.  I still have to finish pulling up carpet AND plywood in Hubby's office and our bedroom, so I'll be keeping my fingers crossed until then.

wide-plank

I'm also super excited because the floors finally getting woodified (totally a word...) is going to be a catalyst for mini make-overs in all of these rooms.  I've already got paint swatches in hand!  Who doesn't love a room make-over?

Plaster Patching

How to patch a swirled ceiling // Year of Serendipity I'm sure we've all seen it: a badly patched textured ceiling.  Joe Homeowner has a damaged textured ceiling and attempted to patch it himself.  He grabbed whatever patching compound he had and spread it over the damage in hopes no one would notice.  The resulting gloppy patch sticks out from the rest of the ceiling like a sore thumb.

For a hot second with this lastest flip, I thought I was free and clear with the textured ceilings- a few of the flat ceilings had issues, but the textured ones looked in good condition.... until I scraped the wallpaper in the hallway and discovered this gem.  The plaster layer of the ceiling was loose and started to crumble and fall the moment I touched it.

damaged plaster ceiling

No Joe Homeowner gloppy fix here!  Unless you're really looking for it, you'd never realize there was a patch! (cue sigh of relief here)

repaired plaster swirl ceiling

As it turns out, a large part of getting the patch to match (giggle) is in the magic coverup mixture:

plaster patch mix

Mix ceiling paint with joint compound until you have a mixture only slightly thinner than peanut butter.

ceiling patch mix

Once I had the mixture set, I went straight for the ceiling and got it perfect on the first try.  KIDDING!  I took a scrap of drywall and started testing out how to get the desired texture.  I tested out 3 different brushes that I had at the house.

texture testing

My verdict was to use the regular paint brush for application, then the large paint brush to texturize.  Now comes the ceiling... but not quite with the texture just yet.

I started with my ceiling by using regular (non-mixed with ceiling paint) joint compound to fill in where the plaster was missing.

ceiling patch

Once that dried, I sanded it and had a great base to texturize from.

sanded ceiling patch

Now comes the fun/difficult part.  As I mentioned above, I used a regular brush to spread the texturizing mixture, then used a large brush to add the correct scale to match the rest.  I paid careful attention to the directionality and pattern of the existing swirls, and tried my best to layer them and match them appropriately.

plaster swirl patch

This wasn't a first try result- I stepped back a few times and re-swirled, stepped back again..... etc... until it started looking like it should.

Not perfect, but definitely a good start.  The biggest difference between the new swirls and the old was the definition.  The new swirls were nice and sharp, the old had been painted over for 50 years.  To make the new swirls blend more, I took sandpaper to it once the patch was dry.  I feathered the edges out and dulled out some of the sharp texturing.

plaster swirl patch sanded

The last step was just to paint the entire hallway ceiling a crisp coat of white.  That was the true test: once everything was the same color, would the patch be noticeable?

plaster swirl ceiling

I'd call it a success!  Would I recommend this for a large blemish in the middle of your living room as a permanent fix?  Probably not.  In that case, skim-coating the entire ceiling would yield the best result... but as a quick temporary fix or a smaller patch in a less visible area (like mine), go for it!!

repaired plaster swirl ceiling

I'm rather proud of the finished result and how well it blends in with the old ceiling.  It's pretty near impossible to get the patch to match 100%, but I dare you to notice it when you're in the space.

Have you had any experiences (good or bad) in attempting to patch a textured ceiling?  I'd love to hear about it!