kitchen

Millie: Kitchen Reveal!

I hope you enjoy these weekly updates as I learn to navigate through the business of flipping houses.  This flip, Millie is the most challenging and most exciting yet! You can find more about this house and about my 3 previous flip houses here. Yesterday's open house was a crowded success with at least one second showing already scheduled!!  I'm cautiously optimistic that this house will move FAST!  I know several of you also made your way over to the open and I'd love to hear what you thought in person!

If you didn't sneak a peek on the real estate listing or at the open, congrats on your patience and sticking with me all the way until reveal week!  The wait is totally worth it, I promise.

So without further ado, I figured why not start with my absolute favorite room in the house.... which started out as not my favorite room... Let's take a drive down memory lane, shall we?

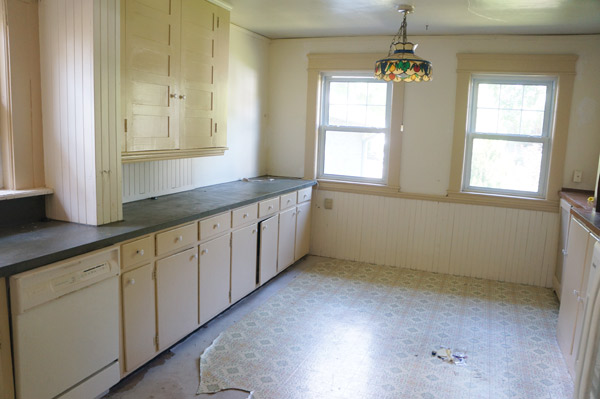
Remember the welcoming kitchen entrance?  Complete with crowding appliances, an offplaced sink, painted laminate countertop, and peeling wallpaper above the windows.

Millie-kitchen-3

Oh that floor still gives me nightmares- sheet vinyl over plywood over 3 layers of vinyl tile all hiding the original hard wood floors.

Millie-kitchen-2

Why do people do this to houses??

millie-kitchen-before-1

millie-kitchen-before-2

Long story short in this kitchen- there was lots of space, but it was not even close to a functional kitchen....

Millie-Kitchen-1

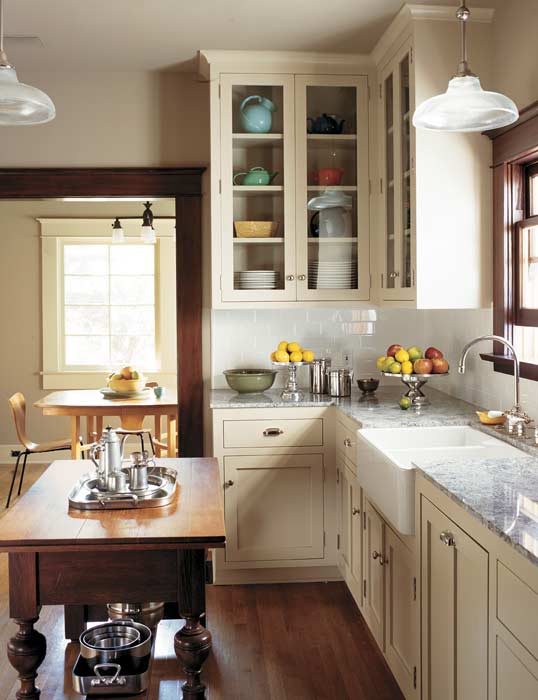
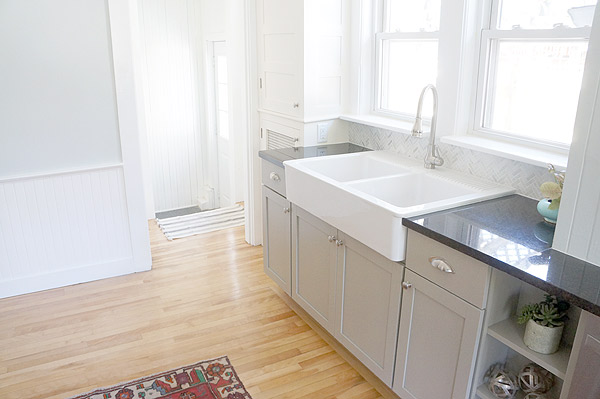
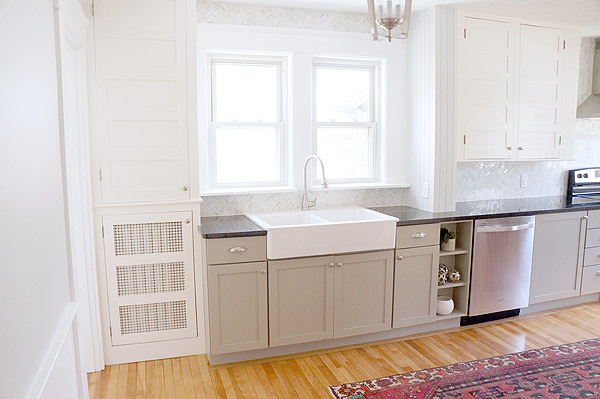
Until now.  How's this for the new kitchen entrance?  Not walking into any misplaced appliances and instead you get a gorgeous view of the window framed farmhouse sink.

Millie the fliphouse kitchen reveal via Year of Serendipity

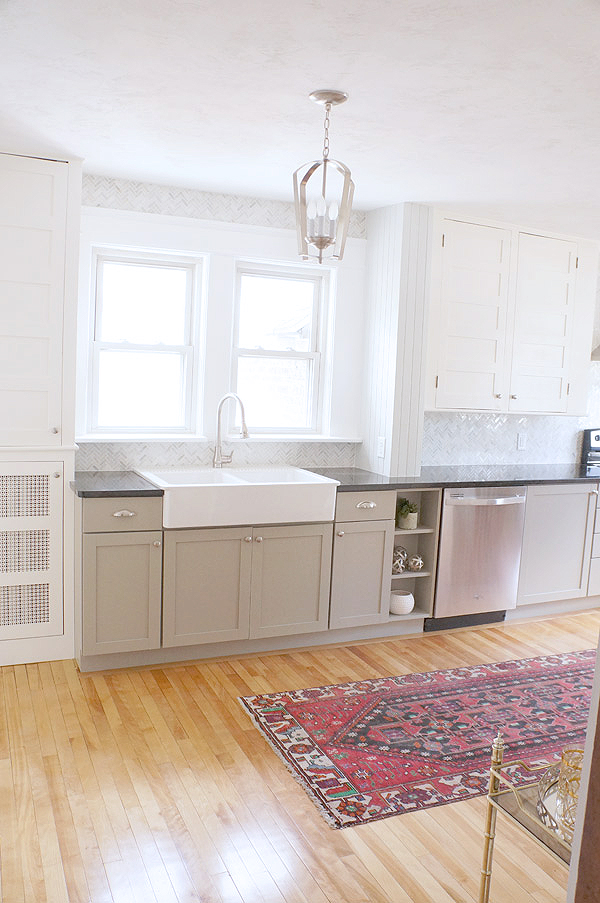
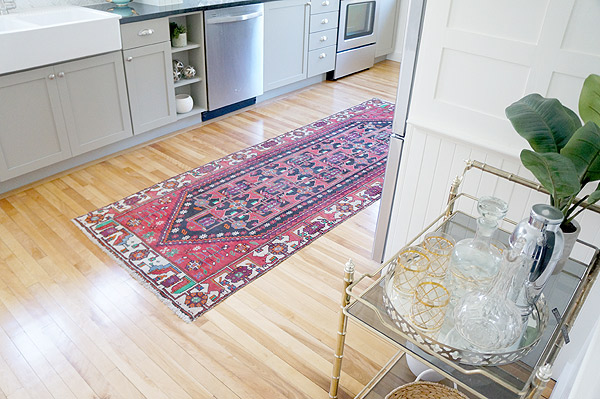
But, Karen, where did the stove and the fridge go???  I gave them real homes and created a proper kitchen triangle.  The fridge is now found on the opposite wall in between the sink and stove.  If you drew a line between the fridge, stove, and sink it would be a nice triangle- which is optimum for a workable kitchen.

Millie the fliphouse kitchen reveal via Year of Serendipity

Millie the fliphouse kitchen reveal via Year of Serendipity

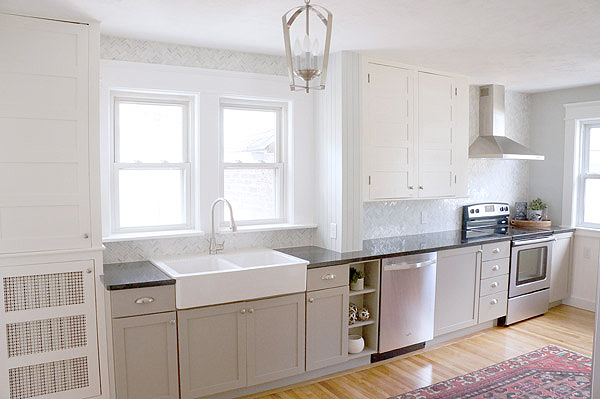
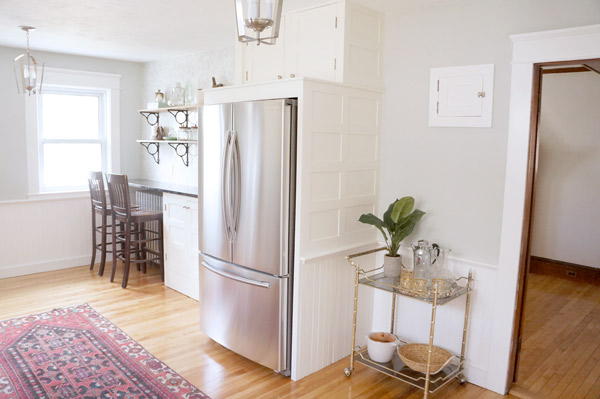
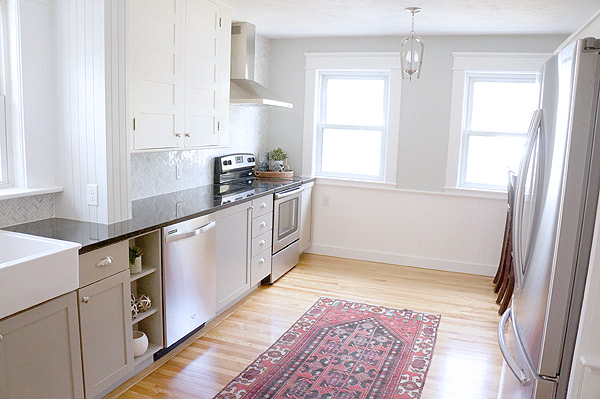
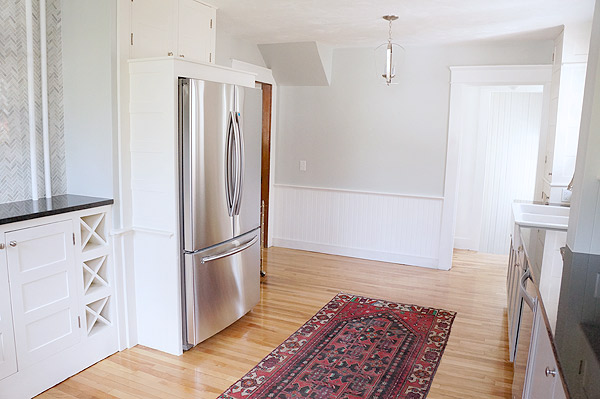
For better or worse, I could talk about this kitchen for days.  In addition to the reconfiguration of appliances, I modified a 100 year old cabinet to give the fridge a home, installed new lower cabinets and countertops, modified another non-original cabinet (next to the fridge) to look original, installed open shelves, and tiled the walls with the sexiest wall tile ever.

Millie the fliphouse kitchen reveal via Year of Serendipity

Millie the fliphouse kitchen reveal with open shelves via Year of Serendipity

The ceiling got all new drywall over the cracking plaster and is now the ONLY textured wall or ceiling in the house.  Even though it's new, going over the old ceiling gave it some lumps and ridges that would have been glaringly obvious if this ceiling was smooth.  Now, with the least amount of texture possible, you see no blemishes, just a clean ceiling.

Millie the fliphouse kitchen reveal via Year of Serendipity

Millie the fliphouse kitchen reveal via Year of Serendipity

Millie the fliphouse kitchen reveal via Year of Serendipity

Millie the fliphouse kitchen reveal via Year of Serendipity

Millie the fliphouse kitchen reveal via Year of Serendipity

Millie the fliphouse kitchen reveal via Year of Serendipity

Millie the fliphouse kitchen reveal via Year of Serendipity

What's a good before and after post without some old and news side by side?

Millie-kitchen-2Millie the fliphouse kitchen reveal via Year of Serendipity

Millie-Kitchen-1Millie the fliphouse kitchen reveal via Year of Serendipity

Millie-kitchen-3Millie the fliphouse kitchen reveal via Year of Serendipity

millie-kitchen-before-2Millie the fliphouse kitchen reveal via Year of Serendipity

And that floor

millie-Kitchen-Before-4Millie the fliphouse kitchen reveal via Year of Serendipity

Come back tomorrow for another space revealed!

Awesome Meringues

There's a first time for everything, right?  How about a yummy recipe today?  I have holiday desserts still on the brain. I do not cook.  Don't get me wrong, if I really wanted to, I can cook, but it's not my cup 'o tea.  That's what I have a Hubby for.  I do, however enjoy baking for special occasions.  Something about licking the bowl and spoon make the effort all worth it.

Meringues get a bad rap for being time consuming to make, but the making part is pretty quick, it's the baking part that takes a while and you just need to set it and forget it.  I've started using meringues as a go-to dessert for a couple reasons.  A- they're sinfully addicting and B- allergy friendly.  Somehow in our small group of friends we've managed to collect almost every food allergy you can imagine, but this little treat satisfies them all- gluten free, nut free, dairy free, etc.

How to make awesome meringues via Year of Serendipity

Here's my favorite recipe and it's super simple, I promise.  I'm not a baker, but I do watch a ton on food network, so that almost makes me qualified, right???

  • 3/4 cup of sugar
  • 3 egg whites
  • 1/2 tsp cream of tartar
  • food coloring or flavoring to taste if you feel like it

You'll want to separate the eggs when they're cold, but then wait to mix them until they are at room temp.  This seems to make the texture of the final product infinitely better and I wish I knew this tip a year ago.

Once your eggs are at room temp, beat them and the cream of tartar at medium speed until they get frothy.  (This is also a good time to preheat your oven to 200)

At this point you'll want to start adding in your sugar slowly.  I usually grab a 1/4 cup and sprinkle it in slowly until I've mixed it all  3/4 in.  Don't dump or you'll have undissolved sugar clumps and no one wants that.

mixing-meringue

With all the sugar mixed in, beat on high until you get shiny, stiff peaks.  If you'd like to add color or flavor, this should be done towards the end of the beating.  I generally add green gel food coloring for my Christmas tree meringues, but leave them colorless for making Halloween Ghosties.  I've also made this recipe using a 1/4 tsp of mint extract or vanilla extract for a little something extra, but the unflavored meringues will be just as delectable.

meringue-color-mix

Once you're done beating, your meringue should look a little like this. Stiff and shiny. (I'll wait while you stop giggling)

meringue-peaks

It should be quite the challenge getting the meringue off the beater.  If it gets too difficult, might I recommend your tongue? ** *disclaimer* consuming raw egg can increase your risk for food-borne illness.  Despite its deliciousness, eat at your own risk.**

Now comes the fun part- piping them onto the cookie sheets.

I use parchment paper on cookie sheets, a disposable piping bag, and a star tip to make my trees.  (for my ghosties, I still use the bag and tip coupler, but leave the tip itself off)

piping-supplies

You are guaranteed to get a little messy during this, but that's part of the fun, right?  In an effort to minimize the sticky mess and get as much meringue in the oven as possible, once you're ready to put your meringue into your piping bag, fold out the top few inches- a little trick courtesy of my grandma.  This gives your hand a bit of a shield, gives you a place to scrape off the meringue, and also guarantees that you don't overfill your piping bag.

piping-bag

Once filled, unfold the end of your bag and twist it closed.

piping-bag-full2

This part might take a few practice attempts, but I promise it isn't hard.  Put one hand at the top of the piping bag, holding closed the twist.  This hand will be doing most of the work by squeezing out the meringue.  Use the other hand to guide. Practice on a plate if you need to get the hang for it.

piping awesome meringues via Year of Serendipity

By creating 3 or 4 decreasing size tiers with your star tip, you get a shape very reminiscent of a Christmas tree.  The good news about meringues is, even if they aren't pretty, they still taste wonderful, so they'll be devoured no matter if they look like trees or the elephant man.

meringues-piping2

Twist the top of the piping bag more as you go along so that the bag always feels full.

How to make awesome meringues via Year of Serendipity

Once you've piped out all of your meringues, place your cookie sheets into your preheated 200 degree oven and wait.  If you vary the shape or size, the time will vary, but for my fat little Christmas Trees, I leave them in the oven for about an 1 hour and 30 min.  Meringues want to be super dried out so as long as you don't up the temp, there shouldn't be too much of a danger of over cooking or burning.  After an hour and change, turn off your oven, and leave the meringues in to cool.  Sometimes you can skip this step, but you risk the danger of them getting sticky later (I speak from experience).

Once your meringues are cool, taste test a couple, pop them off the parchment, and into your serving vessel.  Just try not to eat ALL of your awesome meringues before your guests arrive.

How to make awesome meringues via Year of Serendipity

So there you have it- simple, delicious, allergy-friendly, festive meringues.  What's your favorite holiday treat to make?

Follow-up: after posting I found out about a similar post on Wildflour's Cottage Kitchen with a few more tips and variations.  I love her use of the nonpareils as tree decoration, go check it out!

Vintage Kitchen Planning

Ah, kitchens on the brain. When renovating an old house, there's a delicate balance of creating a nice new functional modern kitchen but still having it fit in with the rest of the historic house. Between Millie's kitchen and a friend's very old/new-to-her kitchen in need of renovations my head is deep in vintage kitchen land. How amazing would it be to live with one of these gorgeous vintage-inspired kitchens??

kitchen-detail-018r-md110772_vert

remodeling-kitchen-craftsman-bungalow-700

0bc27deaee58

sources: Martha Stewart, Old House Online, Jeanne Rapone via Decorpad

I put together these quick sketches to show my friend my recommendations for her limited space.

vintage-kitchen-sketch-1

vintage-kitchen-sketch-2

Fingers crossed that Home Depot has pieces that fit in this puzzle.  That's always the challenge when doing a kitchen on a budget.  In a perfect world it would be all custom all the time!

Flip, wise, my thoughts have finally graduated from obsessing about Millie's bathrooms to the kitchen. As soon as I ripped out the remaining lowers last week I got to obsessing thinking.

millie-w12-kitchen-demo

For one, the plumbing is surprisingly centered under the window unlike the sink that I removed.  They had squished the sink to the side to allow for the dishwasher to sit adjacent, but I'm going to be a rebel and NOT have the dishwasher in the most physically convenient location.  I'd rather the kitchen look intentional than like the pieces didn't fit so you had to squeeze things in.  An extra step to the dishwasher is worth a kitchen that doesn't look accidental in my humble opinion.

millie-kitchen-sketch

Unlike my previous 3 houses, the probable buyers of Millie aren't going to be first time home buyers.  This means they'll be looking for something a bit higher end, and while I'll still most likely use IKEA cabinets, this is the time to step up from the base IKEA products.  If the budget allows, I'll be going for an integrated dishwasher and farmhouse sink.

millie kitchen ikea

With gray cabinets for the new, I plan to paint the original tall and upper cabinets a soft white for contrast.  Mix that in with the counter-to-ceiling backsplash of this gorg beaut

millie-w12-marble-herringbone

Throw in a bit more contrast with a black granite counter and some natural wood open shelves and doesn't that sound like a dreamy vintage-inspired kitchen??

I'm causing a little bit of controversy here in the Goodman household with wanting to put a farmhouse sink here.  Someone, not to name names *coughHubbycough* is not a fan of any farmhouse sink.  Personally I think the farmhouse sink fits in swimmingly in this bungalow kitchen and I honestly can't picture it without it!

What's your favorite vintage kitchen feature?