Flipping

Clark: Week 8

If you’re new to my weekly progress posts, Clark is my first ever flip house (named for the street that he’s on).  Check out my previous posts here. Ak, week 8 already??  Our goal is to get this guy listed by the end of the month! That means I only have about 2 more weeks to get everything done... Craziness!!  I see lots of overtime in my future.

This week didn't start off on a high note- slamming your finger in the car door first thing Monday morning isn't the best start.  Luckily my finger escaped (once I unlocked the door) with just some scrapes and bruises- nothing too serious... and thankfully, the week improved from there.  Handy Dad helped me unclog the plumbing vent stack, which will finally allow the pedestal sink to drain properly and not clog!  I won't go over the entire 'scientific' process with you, but it involved Handy Dad on the roof with a really big stick from the yard tied to a rope (Oh how I WISH I had gotten a picture of this!).  It may have been unconventional, but it worked!

The biggest (literally) thing that happened this week was a new roof!!

w8 roof3

w8 roof2

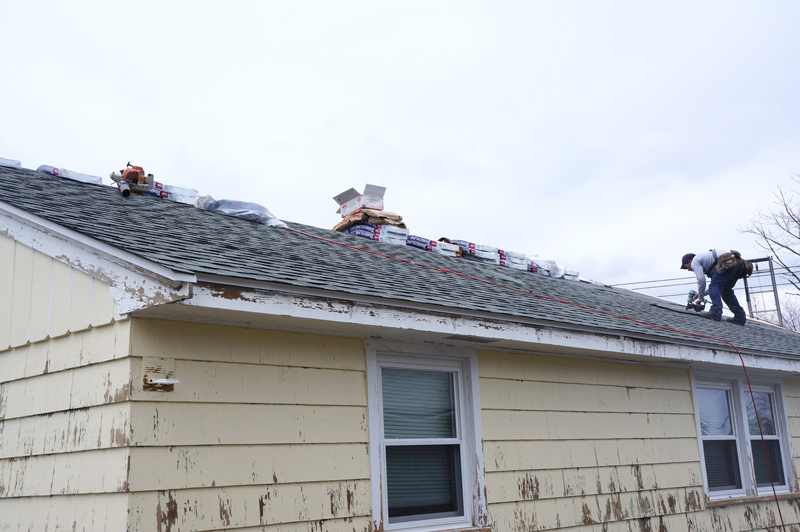
The roof wasn't in horrible condition, but it did need repair.  After talking to several people, I bit the bullet and decided to put in a whole new roof.  New roof = selling feature!

w8 roof1

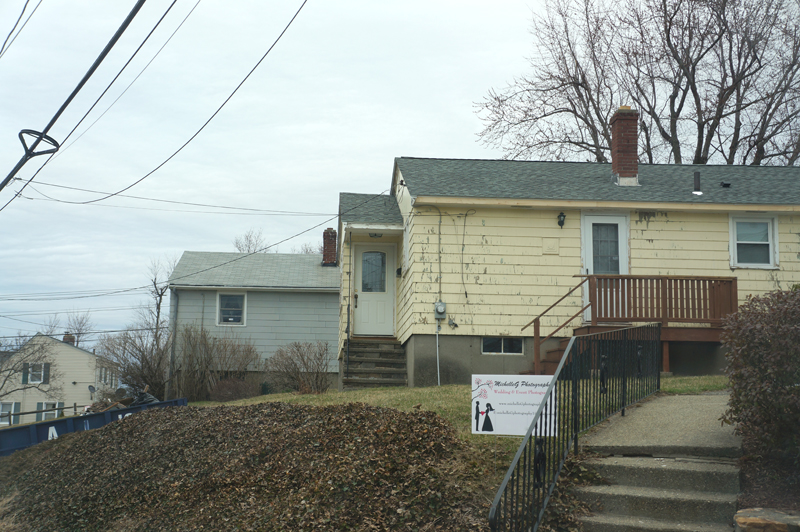
As you can probably also see, he got a exfoliated a bit more too.  The house painter finished pressure washing and scraping.

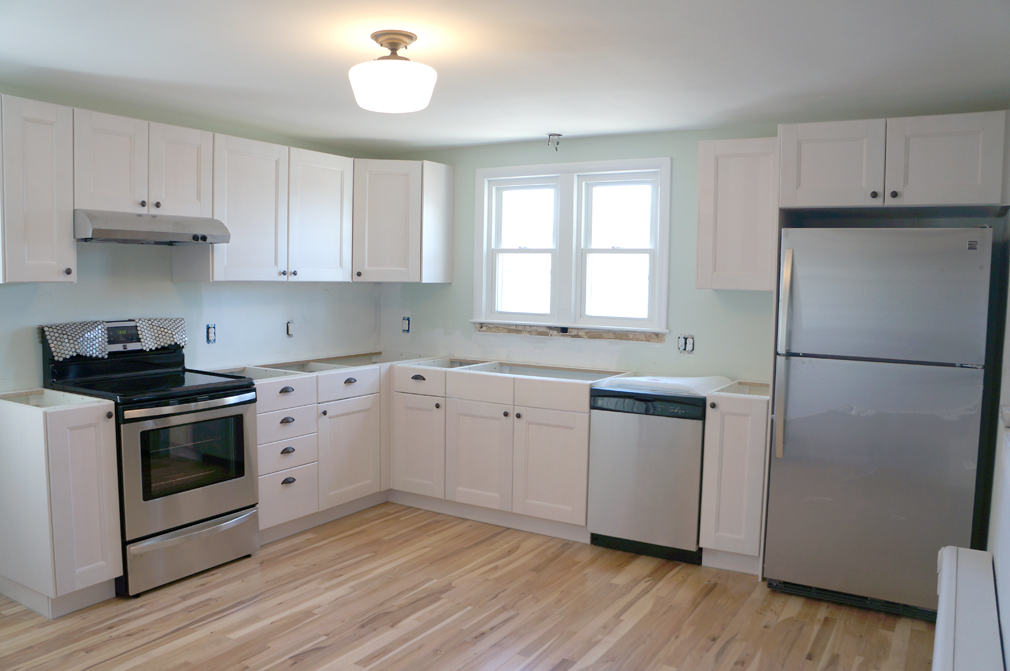
Back inside, little things are starting to make a difference.

w3 kitchen lights

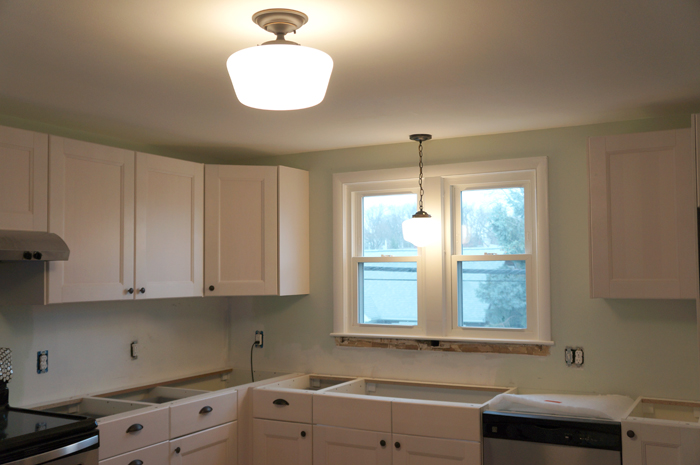
For the first time since owning this house, there is a light above the sink (or where the sink will be).  I still love this ReStore figure- $5 plus spray paint and a chain!!  I do have to change out some lightbulbs, though.  I've been working with the bulbs that were left with the house, but I think every light is a different color variation.  Not kosher to this OCD designer.

I also cut, routed the edges, and painted the wood piece for the kitchen ledge.  I needs another quick coat on top, then I need to actually install it permanently.

w8 kitchen ledge

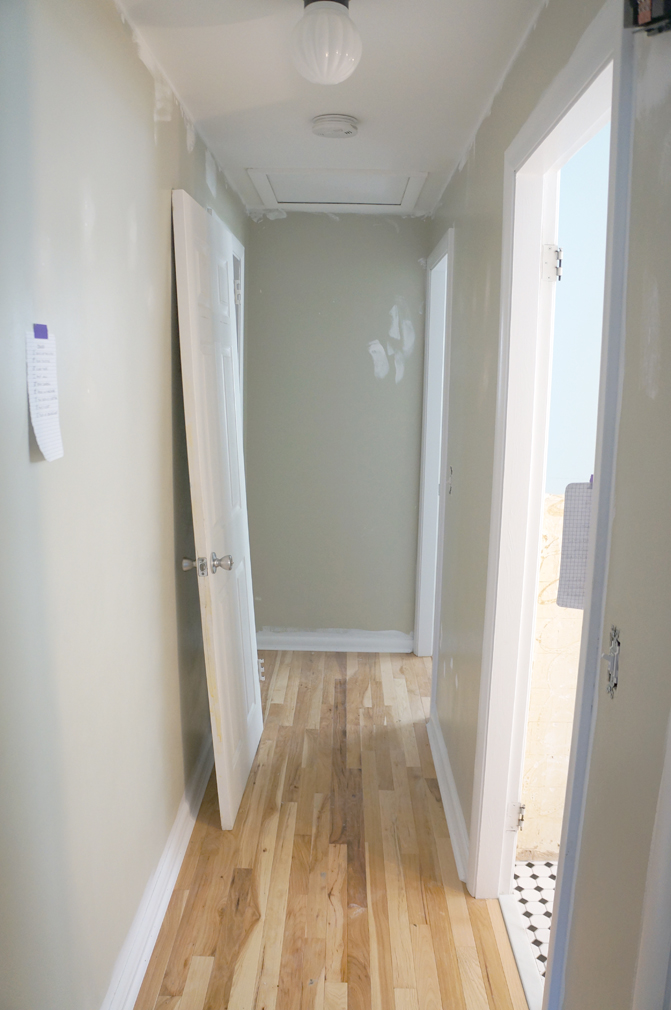
Painting is finally complete in the kitchen and hallway!  It's such a breath of fresh air- something looks complete!

w8 kitchen hall

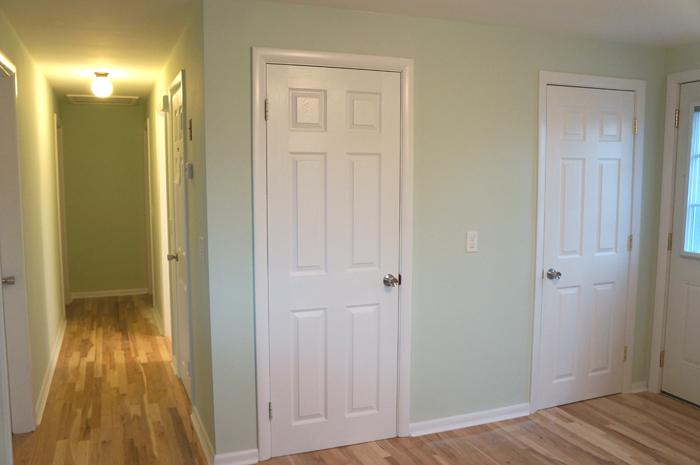
Satisfaction is a completely checked off To-Do list.  It may be just for the hallway, but I'll take it!

w8 hall checklist

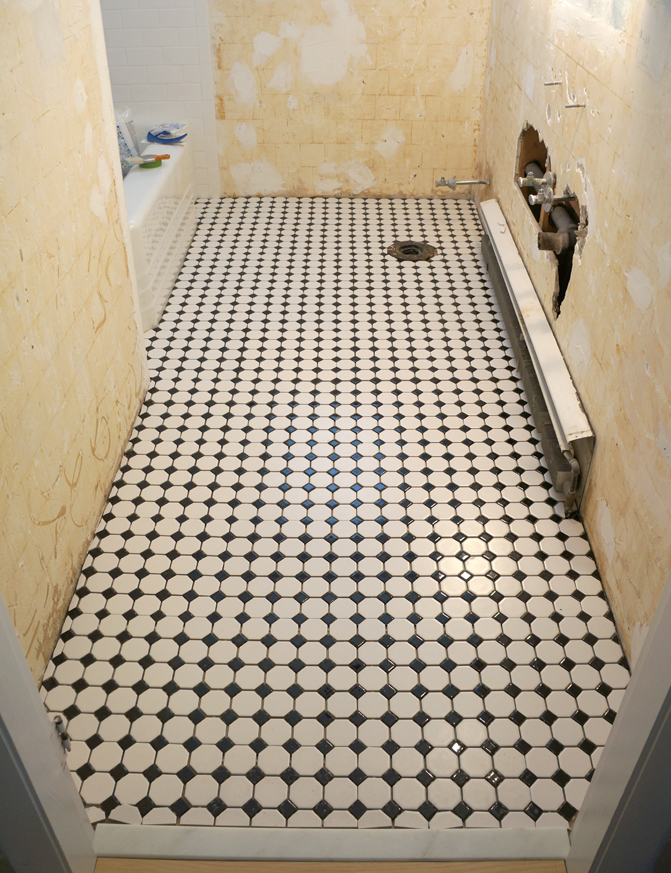
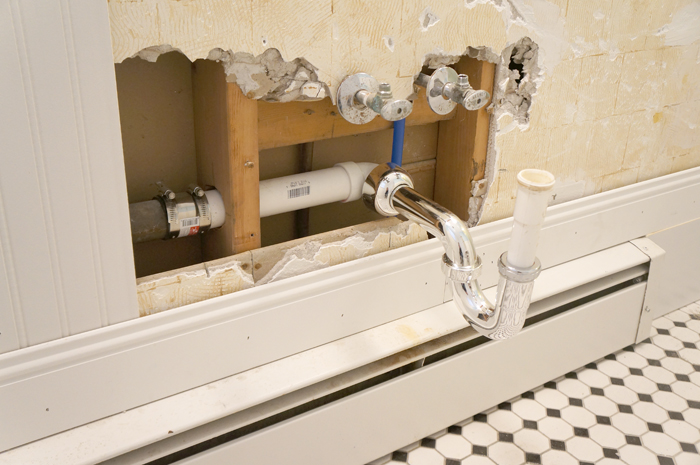
I had it in the schedule that the bathroom would be near complete with working plumbing fixtures again.  The schedule lied.  Either that or I'm slow and was a little too optimistic when setting my schedule.

But if we look from the hall, we can pretend it's done.

w8 hall bathroom

Just don't look further in- reality rears it ugly head and you can tell the bathroom still isn't there yet. I started installing the beadboard, but I have to finalize the sink plumbing before I cover that up.  Do you notice the other new item in here?  New sconces!  The school-house style plays off the other lights I've installed in the house and helps add a bit of character back in.

w8 bathroom1

I had to replace some really bad "previous owner DIY solutions" for the pedestal sink.  I need to put the sink in place and cut the pipe coming out of the wall to the correct size before I do the final install of that, but I plan to get it up and running today.

w8 bathroom plumbing

Speaking of plumbing, I've apparently turned into a toilet hoarder (I guess it's just a branch off my chair hoarder habits).  The previous toilet (in the back) had a scallop on the top that I just didn't think would work with the style I was going for.  Luckily toilets are cheap and for under $100 I got this clean new eco-friendly dual flush guy.  Let's get him in already!

w8 toilets

I've also made attempt at getting back to organized.  I started sorting recycling in the basement.  My town has a recycling drop off center and will happily take my car-full of cardboard and styrofoam.  I like free, environmentally responsible disposal methods.

w8 recycle pile

And since I always try to keep it real and honest here:  Sometime the answer to "why is the furnace not working?" is as simple as an empty oil tank.  Go me.

w8 oil tank

This week, I also:

  • Got the new medicine cabinet and bathroom vent fan
  • Ordered the kitchen faucet
  • Installed a new handle, closer, and wind chain on the side door (I still need to try and knock it back level though)
  • Figured out new handles for the shower faucet (I think)
  • Started figuring out my landscaping plans

Next week is going to be HUGE for my dear Clark.  I WILL have the bathroom working again by Monday- I WILL.  Monday he's getting sexy granite countertops and Tuesday, the horrendous lumpy driveway is being uprooted for a smooth new driveway.  Hello curb appeal!  Well, I guess the real curb appeal will happen once he gets painted- just waiting on a stretch of nice, cooperative weather.

If we want to get him listed in less than 3 weeks, I need to make every second count!

Let's Talk Tile

I'm not sure I fully expressed to you how excited I am about the bathroom floor tile.  It's admittedly not perfect, but hubba hubba. tile closeup

So let's talk process.  This was my first time tiling, so it was definitely a learning experience.

The tools I used were:

  • tile (naturally)
  • tile nippers (for cuts)
  • thinset mortar
  • a drill with a mixing bit
  • a bucket
  • notched trowel
  • margin trowel (smaller for getting into corners)
  • tile spacers
  • grout float
  • grout
  • sponge

After getting the sink and toilet out of the way, I laid out all the tile to dry-fit it.  This is the best way to figure out where you'll need cuts and how the puzzle will all fit together.

tile dryfit

Looks almost like a finished product except nothing is secured into place.  I took this time to start making ALL my cuts.  Since my tiles are small and almost all my edges will be covered (by wainscoting at 3 walls and caulk at the tub), I used tile nippers.

tile_nippers1

You can probably see in the pic of the floor above, just how many little snips I had to do.  I lost count of how many little black tiles I snipped in half.  Let me tell you, though, these things are secretly dangerous.  Every tile you nip sends tiny shards everywhere.  Not only did I make quite a mess, but I ended up with what looked like paper cuts all over my hands.  I'm willing to bleed a little if it means pretty tile like this, though.  I did take a run to Lowes and have them cut (for free!)  the tile that I needed at the threshold since that would be much more exposed and visible.

Then, as Ted would say on What Not to Wear, I mixed up the magic.  After a bit of internet research, I found that thinset mortar should ideally be somewhere near the consistency of peanut butter or mayonnaise.

mortar mixing

Once you spread it out like below, you then go back over it with your notched trowel.

floor mortar

The first corner, so exciting! (see the notches from the trowel?)  My tile's were mounted on 1 foot x 1 foot sheets, so I only needed to use spaces between the sheets.

first tiles

It went rather quickly once I got the hang of spreading the thinset.

tile half way

It did inevitably escape through several of my grout joints, but luckily there's a simple solution for that.

escaping mortar

Once the thinset is dry, you can go back with a utility knife and scrape down any areas of thinset run-aways.  You don't need to scrape it all away, just low enough to allow for gout over it.

When I got to the transition, however, I had an issue.  My tile installation had migrated just enough towards the doorway that the cuts I had gotten at Lowe's no longer fit.  Luckily it's only a few minutes away, so I quickly measured the cuts that I NOW needed and ran out to Lowe's so I could get the last few cuts and install the pieces before the mortar I had mixed dried.

tile transition

After I got back and installed the last few tiles at the door, I noticed another issue.  See the 2 tile's popping in the middle?

tile pop closeup

I removed the trouble-causing spacers, pressed down the 2 rogue tiles and hoped they would adhere into place.  Only one did.  When I came back to check on them the next day, the little black tile was free.  I scraped the thinset from below it and mixed up about a spoon-full of new thinset to reset the little guy.

missing tile

After giving him some time to dry, I removed all my spacers and got to grouting.

tile spacers

In my eagerness to grout, guess who forgot to take pictures?  This girl!  It's not too visual of a process though.  Step 1: Spread mud all over your pretty new tile.  Step 2: Use sponge to clean it off.  Step 3: Let it dry.

Then you get a pretty finished floor like this one.

w7 bathroom floor

Clark: Week 7

If you’re new to my weekly progress posts, Clark is my first ever flip house (named for the street that he’s on).  Check out my previous posts here. This week was a bit of a roller coaster.  I worked a lot on the bathroom, so there was a slow build to the high of grouting and completing the floor on Wednesday, then a swift decline yesterday when I decided to try and get the pedestal sink in working, draining order to no avail.  I think it might have a venting issue, but the toilet and shower had no draining issues.  If there IS a clog, my snake/auger wasn't finding it.  Lesson learned: save a day of wasted progress and frustration, call a plumber.

But, the project as a whole is still chugging away.  I feel my giant To Do list is FINALLY getting shorter.

The kitchen now has appliances!  Pretty new stainless steel appliances!

w7 kitchen 1

I'm kicking myself a little for not getting a larger cabinet for above the fridge, but I have a plan.  I had some left-over trim that I didn't have installed on the cabinets, so I'll be installing a piece above the fridge to bridge the gap there a bit.

In the interest of showing you the reality of a flip, you can see the disaster that still is the living room.  It's still the junk pile until I can get the kitchen and bathroom major projects under control.

w7 kitchen 2

The countertops were supposed to get templated yesterday but the installers got held up at another install, so hopefully I can get them in early next week.  I can't get to the tile backsplash until the countertops are in.

You may have noticed the backsplash options hanging out on the stove in the previous pic.  My color options are Moss(left) or Milk(right).  I actually had been planning the Moss all along and planned the wall color to match (with a simple white trim line between the green tile and the green walls, I thought that would be a great way to have color in the space but not be overwhelming to potential buyers).  The Milk color I think will blend a little too much with the cabinets,  but of course I'm second guessing.  I have 2 boxes of the Moss that I got when the Tile Shop (which just opened by me) was having a 20% off sale.  $4.64/sf + tax for these lovelies is an amazing price!

w7 tile debate

I think I'm sold on the Moss, but I need backup.  Won't it look amazing once the gray granite countertops are in?  Won't it??

Even though the hallway didn't have any major work done this week, it's still the area closest to being done.  The one thing that the hallway as well as the entire house got this week was updated light switches!  Nice clean white ones to replace all the yellowed dingy 50+ year old ones.  Such a small fix, but it just makes the whole house feel more up-to-date. w7 light switches

To check every box of my To Do list in this area, I just need to paint and reinstall the switchplates.

w7 hallway

As you can see, it's also the current home of the bathroom door.  Now that I've installed new tile and a new marble transition at the door, I need to trim down the bottom of the door.  Not a problem, I just need to muster up the energy to drag the door down the basement stairs and into the garage where the magic woodworking is happening.

And speaking of new tile and transition...

w7 bathroom floor

Yet another floor in this house I want to pet.  That's not creepy I hope....  Although I paid to get the shower tile done, this floor was all my blood and sweat (literally) and I'm rather proud of it.  First tile job ever and I think it came out pretty darn good!

In my plumbing frustration yesterday, the bathroom wall also got a few more holes.  No, I didn't punch holes because of my frustration, I opened the holes so I could see where the plumbing lines were running and connected in the wall.  Still didn't help.  Luckily, the lower half of the walls is getting wainscoting (next week), so all these unsightly holes will be covered up without having to patch them (huzzah!).

w7 bathroom wall

The bathroom also got it's top-half painted this week.  More color? In a flip house?  I'm a rebel like that.  The way I see it, with the white subway tile shower, the black and white floor, and the white wainscoting that's yet to be installed, a little splash of blue in here will feel serene and add a little warmth.

w7 bathroom paint

In addition to the kitchen and bath (which were always the rooms that needed the most love and work), the exterior got some attention too.

w7 exterior

It has to get worse before it gets better, though.  In the advent of nice weather, the house painter got started on cleaning and pressure washing all the chipping paint.  I still need to finalize the exterior colors, but hopefully the weather cooperates and we can get the house painted very soon!

The other things that got accomplished this week include:

  • Getting another roofing quote (now waiting for them to stop by and see if the roof has 1 layer of shingles or 2 currently- its the difference of $ vs. $$)
  • Getting a gutter quote (waiting to pull the trigger until I figure out the roof)
  • Ordering a new medicine cabinet
  • Fixing the wood transition at the bathroom door (it wasn't quite right the last time I did it)
  • Set a date for a new driveway!  April 16th, YAY!!!

Next week I'm hoping to pull the trigger on all the big ticket exterior items and get those going.  Slowly, but surely this place is getting done.  I don't want to jinx myself, but it looks we're on target to have Clark back on the market by the end of the month.