Bathroom

Millie: Bathroom Reveal!

I hope you enjoy these updates as I learn to navigate through the business of flipping houses.  This flip, Millie is the most challenging and most exciting yet! You can find more about this house and about my 3 previous flip houses here. After a week of reveals, we've finally reached Friday and the last space inside the house to show you: the family bathroom!

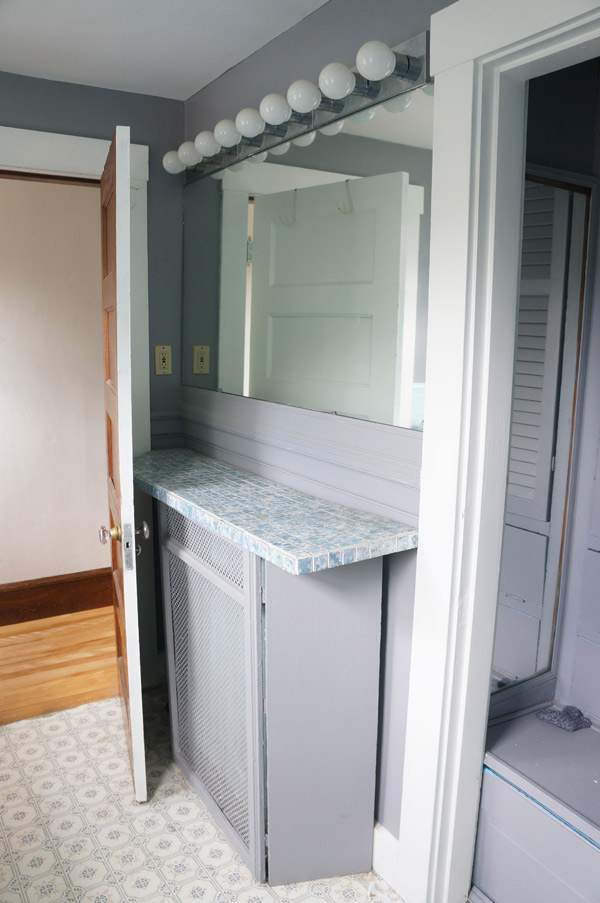
Originally it was giving me a bad case of the blues.  A very bad case.

millie-bathroom-before-1

But no more

Millie the Fliphouse family bathroom reveal via Year of Serendipity

millie-bathroom-before-3

Millie the Fliphouse family bathroom reveal via Year of Serendipity

millie-bathroom-before-4

Millie the Fliphouse family bathroom reveal via Year of Serendipity

millie-bathroom-before-5

Millie the Fliphouse family bathroom reveal via Year of Serendipity

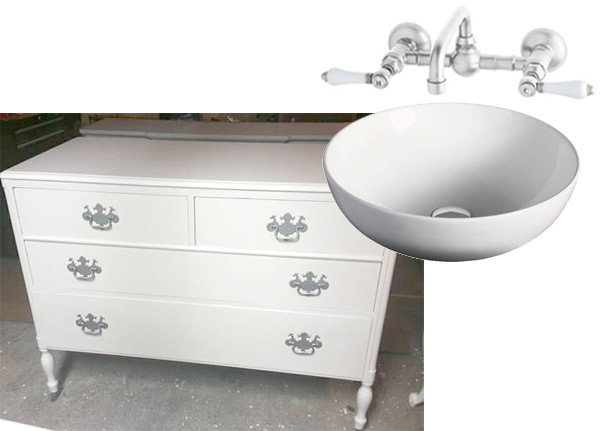
One of the key things that I did in this bathroom to make it feel so much larger was to pull both the sink and the tub of the floor.  Now that you can see the tile floor continuously, the bathroom feels much more spacious.

Millie the Fliphouse family bathroom reveal via Year of Serendipity

Millie the Fliphouse family bathroom reveal via Year of Serendipity

And the shower curtain still makes me weak in the knees- SO perfect for the space!

Millie the Fliphouse family bathroom reveal via Year of Serendipity

Aside from my sheer excitement to be wrapping up all the interior work, I'm also very relieved that the yard didn't fare too terribly over the winter.  After all the time and energy that I spent on it last fall I was afraid that it would be back to a mess this spring.  Let's take a walk down memory lane.

Millie-Ext-1

Same house, same vantage point, but it looks a bit different, no?

Millie the Fliphouse exterior reveal via Year of Serendipity

Millie-Ext-6

While not in bloom quite yet, the view on this charming little street/walkway has changed for the better and the neighbors couldn't be more happy.

Millie the Fliphouse exterior reveal via Year of Serendipity

Who knew this...

Millie the Fliphouse exterior reveal via Year of Serendipity

was hiding under all this?

Millie-Ext-10

And this, I kid you not...

Millie-Ext-before-1

turned into this (disclaimer: when I say turned into, I do mean took many many hours of sweat and hard labor).  For a reference point- the holly filling up the left of the before pic is the nicely trimmed holly bush to the right of the porch.

Millie the Fliphouse exterior reveal via Year of Serendipity

I couldn't be happier with the transformation that this house has gone through!

If you missed the rest of my week of reveals, go check out the kitchen, bedrooms, master suite, and living areas.  I dare you not to want to live here!

I'll leave you with one last picture.  This image is of one of the basement murals and I think it's a great way to conclude this renovation.

Sunset and Journey's End

millie-journeys-end

Millie: Master Suite Reveal!

I hope you enjoy these updates as I learn to navigate through the business of flipping houses.  This flip, Millie is the most challenging and most exciting yet! You can find more about this house and about my 3 previous flip houses here. So far we've visited the finished kitchen and upstairs hallway and bedrooms.  Today we visit the new master suite!

If you'll remember, this master suite did not exist when I bought the house.  Changing this den/reading nook into a master bedroom and bathroom added the most value to this house of anything I did.  It took it from a 3 bed, 1 bath to a 4 bed, 2 full bath.

It's nice to be reminded of where it started.

Millie-lr2-4

Millie the Fliphouse Master Suite Reveal via Year of Serendipity

Oh 70s paneling.

Millie-library-3

Aaaahhhhhh, no more paneling, wallpaper, or crazy wall texture over wallpaper.  Nice smooth walls.

Millie the Fliphouse Master Suite Reveal via Year of Serendipity

Luckily, I didn't need to do much to transform this room into a bedroom.  It already had a pocket door at the entry and built-ins.  All I needed to do was close off a pass through to the kitchen and create a sweet bathroom in the reading nook off to the side.

Millie-library-2

Millie the Fliphouse Master Suite Reveal via Year of Serendipity

Millie the Fliphouse Master Suite Reveal via Year of Serendipity

The pass-through to the kitchen combined with 2 small back to back closets are now a pretty walk in closet.

Millie-Future-bathroom-1

Millie the Fliphouse Master Suite Reveal via Year of Serendipity

No more pass through.

Millie the Fliphouse Master Suite Reveal via Year of Serendipity

The built-in just got minor repairs and some new paint.  Please please PLEASE refrain from painting cabinet hardware.  Especially blue.  The last owner LOVED blue.

Millie-Future-bathroom-2

Millie the Fliphouse Master Suite Reveal via Year of Serendipity

I saved a light from the entryway which may have been original to the house and used it in here.

Millie the Fliphouse Master Suite Reveal via Year of Serendipity

To create a new bathroom, we enclosed this little reading nook and built a new pocket door- complete with salvaged leaded glass to match the rest of the house.

Millie-library-1

Millie the Fliphouse Master Suite Reveal via Year of Serendipity

I did have to sacrifice the canvas ceiling in this little reading nook, but I think the bathroom was a worthwhile trade.

Millie-library-5

The bathroom got shiplap walls, a claw foot tub, a dresser-turned-vanity, and naturally, a toilet.

Millie the Fliphouse Master Suite Reveal via Year of Serendipity

Millie the Fliphouse Master Suite Reveal via Year of Serendipity

Millie the Fliphouse Master Suite Reveal via Year of Serendipity

Millie the Fliphouse Master Suite Reveal via Year of Serendipity

Millie the Fliphouse Master Suite Reveal via Year of Serendipity

future-bath

Luckily we were able to salvage enough plate rail removed from the bathroom to patch in for the new smaller opening in the bedroom.

Millie the Fliphouse Master Suite Reveal via Year of Serendipity

I don't know about you, but I'd love to live in this master suite.  You (I) had me at clawfoot tub.

Millie the Fliphouse Master Suite Reveal via Year of Serendipity

Maybe in my next house (that I live in), I'll build one for myself.

Tomorrow I'll show off the living roomS and dining room!

5 Ways to a Luxurious Bath

This week's "5 Ways" post is brought to you by DecorPlanet.com. If you've been following me for more than a week, you have probably figured out that I have put a lot of thought into bathrooms as of late.  With Millie the fliphouse's bathrooms finally coming together, I thought it would be the perfect time to share some of my thoughts on successful and luxurious bathrooms that don't have to break the bank.

5-ways-lux-bath

1.  Splurge on the sparkle.  And by sparkle, I mean fixtures.  Spend the money on what draws attention.  What could be a generic sink can be instantly transformed with the proper faucet.  Whenever I use a vintage or thrifted sink, replacing the fixtures is imperative to making it look high end.  Joanna Gaines executed this perfectly on an episode of Fixer Upper with this upcycled dresser/simple vessel sink combo.  With a generic faucet, it would be just a nice space and you'd instantly forget it.  With those faucets, it's a stunner.

9b089dc6bcbf20d52b10ee77bfe615f0

Similar to what I'm planning in the flip's new master bath, you can recreate this look with your own thrifted dresser, simple vessel sink  and a wall mount faucet such as this Rohl Acqui Bridge Faucet, both from DecorPlanet.com.

dresser-faucet-sink


2.  Tile- think outside of the box.  With most of my projects, I admittedly try and save a bit of money where I can.  Often times, that money savings opportunity comes with tile.  Thinking outside of the box with tile doesn't mean you have to think outside of the box store.  All you need to do is look at tiles a little bit differently.  This bathroom from Apartment Therapy shows that varying the shape of generic white tiles shows the power of tile.

00b291df9534d91c5be1af8c92c3b888


3. Enjoy the little luxuries.  If you don't have it in the budget for a whole bathroom reno, how about adding a towel warmer?  Who doesn't love getting wrapped in a warm towel on a cool day?  A little touch of luxe can go a long way to making the entire room feel more high end (plus you'll be all warm and cozy: win-win!)

amba_swivel_jill-b002_stock_01-web_385

4.  Maximize your storage.  Nothing makes a bathroom feel less luxurious than piles of towels, toiletries, and grooming tools.  Even in a tight bathroom, it's possible to find a place for everything with some creative organization.  If you aren't blessed with tons of built-in storage space, furniture and other vessels can really do the trick.

1f0fdbcc9fa98d6356edf4b5d335ff96

image via BHG

I'm swooning over this Fresca Oxford Antique White Linen Cabinet from DecorPlanet.  Cross my heart and kiss my elbow, I'd be saying this even without this partnership.  With it's slim footprint and classic door style, it can fit into almost any space and be exponentially useful.  Zazz it up easily with some Anthro knobs.  I can just see 2 of these flanking a beautiful vessel sink and it would be pretty epic.  Tons of storage in a small space.

fst2060aw-4


5.  Accessorize.  Did you not expect me to go there?  It's always the last layer that makes a room, and it's no different in a bathroom.  In addition to a fun mirror and patterned or textured towels, think about what else might be useful and beautiful.  A vessel to stash your everyday items within reach, a stylish makeup mirror to make sure you're ready for your closeup (or selfies), and what about a basket with a few rolled towels for easy access for guests.

bathroom-accessories

mirror: DecorPlanet/ box: Target/ soap dispenser: DecorPlanet/ basket: IKEA/ towels: Target/ makeup mirror: DecorPlanet


Thanks, DecorPlanet.com for collaborating on this post!