Flipping

Grover: Week 3

I hope you enjoy these weekly updates as I learn to navigate through the business of flipping houses.  Check out  more about this flip, Grover, or check out posts about our last flip HERE. This week I made a mess.  A big mess.

grover-w3-demo-pile

I'm waiting until the contractor gets started to bring in a dumpster due to the limited parking situation at the house, so until then, the dining room and garage will be less than spotless.  You might also notice, Mr. Sledge Hammer, and Miss Built-in had a bit of a fling.  Looking better already, I think!

The partial kitchen demolition was driven by necessity.  See that little black box where the sink will be?  It's actually a heater that will replace the one that's on the wall that's coming down.  (I cannot WAIT for the wall to come down!)

grover-w3-kitchen

Even though the kitchen's starting to come apart, I spent about 80% of my week in the smallest room of the house.

Remember how there used to be a VERY blue bathroom?  The lone blue toilet is all that's left.  I'm kind of in love with this picture.

grover-w3-bathroom

All of the tile is gone with the exception of a few behind the toilet.  The driving factor for this surprisingly speedy bathroom gut is peaking out there on the right.  Do you see it?

That's right..... a NEW TUB!  In the last house, I painted the painfully pink tub and I decided to try something different here.  Although it cost about double, in this smaller bathroom, the dated style tub was pretty in-your-face.  The new tub in combination with the more open layout I'm planning will make this bathroom feel probably double the size as when I bought it.

grover-w3-tub

No, I haven't forgotten about the lone blue toilet.  He'll be ousted as well, but, being the only toilet in the house, he is still has an important role.

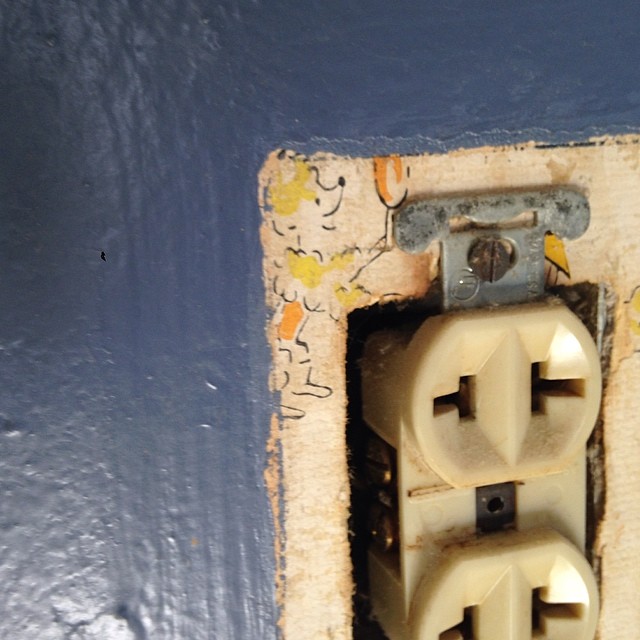
If you own a house, or ever plan to, please take note.  This is NOT how to wire ANYTHING.  Hiding things like this and open junction boxes behind cabinets is not even close to the right way to do it.  Just don't.  Your house will thank you.

grover-w3-bathroom-wires

While my plumbers were doing their thing with the tub and heater, I started roaming the house looking for smaller tasks to tackle.  You already saw the scallop-less built-in, but I also spent quite a bit of time in the bedrooms.  Let the paint prep begin!!

grover-w3-patching

The walls now totally remind me of having chicken pox as a kid and being spotted with calamine lotion.  Don't worry, Walls, you'll be feeling/looking better in no time!

And now that I've started off my Friday by anthropomorphizing walls, a built in, a sledge hammer, and a toilet, I think it's time for me to go smash a kitchen.

Have a great weekend!!

Wallpaper Nemesis

AKA "One girl's journey through wallpaper removal"  AKA "Wallpaper Removal 101" wallpaper start

The hallway of Grover the Fliphouse I'm sure was considered stylish once upon a time, but it wasn't so much the case when I got my hands on it.  There was a snake-skin-ish wallpaper pattern (original to the house) that was painted over, then wallpapered over in the 80s or 90s.  Very pretty, don't you think?  Nope, it had to go.

This wasn't my first tango with wallpaper removal, but it was my first time with this many layers.  It's actually very simple, but time consuming and messy.  You've been warned.

Wallpaper removal supplies:

-Scraper/putty knifes of varying sizes

-Boiling water

-Spray bottle

-Wallpaper scorer

-Patience.  Lots of patience.

wallpaper wall

Once I practiced my technique and figured out what in the world I was doing, I saved this little sliver of wall to show you guys.  Wallpaper removal can be super taxing, so I'm all about working smarter, not harder (that's where the patience comes in...)  The only thing I did prior to the above pic was attempt to peel some of the top layer off dry.  As you can see, on this wall, it was stuck pretty darn good, although on others, I was able to peel it off in sheets.  Like I said, though, smarter, not harder.  If the layer didn't come off, I didn't force it (until later).

Lots of people recommended trying a wallpaper solvent, but I opted to try boiling water first.  It ended up working pretty well for my wallpaper, so I stuck with it, but every wallpaper case is going to be different.  Even the 2 wallpapers that I was dealing with acted differently: the newer coming off easily in sheets, and the older crumbled.

As for my process:

1. Score wallpaper

2. Boil water

3. Spray wall with boiling water (careful not to burn yourself!)

4. Wait.  a while.

5. Repeat steps 1-4 until your wallpaper easily comes off the wall.


How's that for over-simplifying?  I can't emphasize enough, PATIENCE!  If you allow enough time for the water to really penetrate into the wallpaper, your arm will thank you.

Allow me to demonstrate.

The more modern layer of wallpaper came up pretty quickly.  Once it was scored and soaked, the top layer had little resistance.  Using a putty knife to get under the edge, I was able to remove large pieces until I reached layer #2.

first layer wallpaper

Layer #2 is where the real patience came into play.  It was essentially kraft paper glued to the wall and painted over... it was holding on tight.

Score:

wallpaper score

Spray:

wallpaper spray

Wait.

Repeat.

Score, spray, wait....score, spray, wait... spray, wait...  I found it best to either work on 2 areas at the same time (so while one was waiting, I could be spraying the other) or walk away altogether while the water was penetrating.  I did try to eliminate the "boil water" step, but the steaming water seemed really get in there and do the job better.

The 2 most important things here are: make sure you have a decent spray bottle (I went through 2) and HAVE PATIENCE.  Have I mentioned that?  If you try to scrape the paper before the water's done it's job, you'll end up doing much more work than you need to.

When you think it might be ready, take your scraper to the wall.  If the paper comes off with little resistance, go for it.  If not, spray again and wait.

wallpaper scrape

Even during the scraping phase, I would re-spray everything down to make sure that nothing dried out before I got to it.  If you find spots that give you a hard time, don't force it.  Spray them again and come back later.  The more you force the paper off, the tireder your arms get, and the more scraped up your wall will get.

Since I allowed the water to do the majority of the work, it only took me about a half an hour to actually scrape off all of the old wallpaper.

wallpaper progress

Even after scraping every other wall in the hallway, I was shocked at how cleanly the paper came off of this wall.  On other walls, I was less patient and tried to muscle the paper off, leaving residue.

wallpaper residue

Luckily all I had to do was spray down the walls again (and wait), and the paper remnants came off no problem.

And finally the hallway walls were wallpaper free!  And the townsfolk rejoiced.

wallpaper gone

Now if only demoing walls in the bathroom was as easy!

Like I mentioned earlier, different types of wallpapers act differently, so I'd love to hear what worked (or didn't work) for you!


Grover: Weeks 1 & 2

The computer gods are not smiling on me today.  I'm currently blogging from Hubby's PC because attempting to plug an unapproved iphone cable into my Macbook caused it to implode (ok, maybe not implode, but suddenly go dark and not turn back on). boooo.  It has a dr. appointment at the Apple store this afternoon.  Wish me luck! Now back to your regularly scheduled programming.

I hope you enjoy these weekly updates as I learn to navigate through the business of flipping houses.  Check out  more about this flip, Grover, or check out posts about our last flip HERE.

I know I just introduced you to Grover last week, but this is technically the end of week 2.  Light demo started last week as I tried to work out my plans for this house.  With previous flips, I had my gameplan prior to closing and went in guns blazing on closing day, but since we closed on this when I was still finishing up Frankie, that was not the case here.  Good news, though, I have it figured out!  Now I just have to execute my plans.... the easy part.... right?

In the past 2 weeks, I've succeeded in making the house look worse.  It has to get worse before it gets better though.  (apologies for the quality iphone pics.... must remember to bring good camera...)

Original hardwood floors were hidden by horrific laminate.  They're covered in carpet adhesive and have a bit of pet staining, but they are going to buff up nicely!  To quote Nicole, HGTV's Rehab Addict "Why in the hell would you cover that up?!"

hardwoods

Those floors are really what I'm most excited about.  Especially since I'm planning to rip out the icky, stinky, linoleum in the kitchen:

kitchen floor

and replace it with gleaming new hardwood floors in there too!

kitchen floor wood

Since the hall and bedrooms still have the original hardwood floor as well, completing the wood in the kitchen will make it hardwood floor throughout.  Swoon.

I haven't smashy smashy'd the kitchen yet, I've been focusing on much more tedious tasks such as tearing down multiple layers of wallpaper and removing tile in the bathroom.

wallpaper floor

Ah wallpaper... what a fun task...  Thankfully, the hallway will be wallpaper free by the end of today (Wallpaper detail post coming next week, per request).  I've spend most of my week in one of the smallest areas of the house.

wallpaper hall

So far I have located 5 different wallpapers in the house.  2 layers in the hall, 2 hidden behind the bathroom mirror, and 1 that was painted over many many times in the kitchen.  Isn't the lollipop poodle cute?

poodle wallpaper

Since this was painted over SO MANY TIMES (and I'm taking down half of the wall anyway) I'm not actually removing it.  It's cemented in there by now and aside from at the switchplates, you can't tell there's any wallpaper there anyway.

And speaking of amazing wallpapers, when Handy Dad and I pulled down the bathroom mirror to find another remnant of wallpaper, "WOW" was the only word.

upic wallpaper

Let me assure you, it's much more impressive in person.  Neon green with gold glitter.  I'm framing this!

I have also started the de-blue-ification of the bathroom.  Bye bye blue tile.

bathroom progress1

Although I'm all for embracing retro tile if they're good quality, this tile was not.  The previous owners had even covered part of it up in the shower with cheap paneling.  shower wall

They had apparently taken a part of the original tiled wall out and layered up 3 sheets of backer board under the paneling... not exactly the way it should be done.  The shower will soon be gutted and done the right way.

The much less messy (and subsequently less interesting) things that have also been accomplished in the past 2 weeks are:

-getting quotes from electrician, contractor, flooring guy, window guy

-planning out the IKEA kitchen

-working out the budget

I still have a lot of work ahead of me, but with each house, it feels less daunting.  My next step is to work out the timeline and schedule.  What needs to happen in what order to be most efficient?  I really can't wait to get the kitchen wall down and get the floors in, though.  I just hope it's half as epic as the picture I see in my head!