Grover: Week 13

I hope you enjoy these weekly updates as I learn to navigate through the business of flipping houses.  Check out more about this flip, Grover, or check out posts about our last flip HERE. I got a pleasant surprise yesterday when I got to Grover- the floors have a first coat on them!!  The only bad part of this news is that I had to try and take this week's progress shots for you while standing in the back doorway since I couldn't step on the floors.

I admittedly didn't spend a ton of time at Grover this week- the bulk of my time was spend schlepping things from Craigslist and staging Frankie for under $1000 (who's looking pretty spectacular if I do say so myself).  When I was over at Grover, I kept myself quite busy prepping the living and dining room walls and trim and starting to prime.

w13-floors2

but look at those floors!!!  The floor in the living room (the red area) is 100% original while in the dining room (bottom right of pic) new floors were woven in with the old so that the kitchen's (area on left in blue) new wood would blend.  I heart them.

w13-floors

I'm quite excited to switch out the dining room fixture for my 'new' craigslisted Restoration Hardware chandelier... of which I have no good picture of because it's in the basement and as I mentioned...I couldn't step into the house...  BUT, I found this picture on e-bay of one-size-up chandelier.  Mine only has 5 arms.
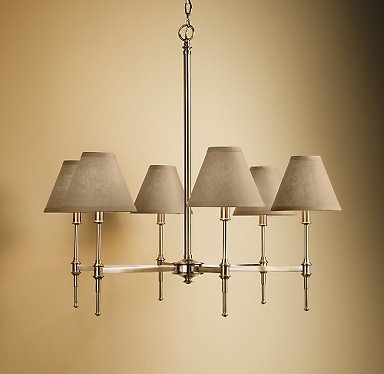
restoration hardware light

Mine's brushed nickel and doesn't have the shades.  No shades is a good thing, a very good thing- those shades make it feel traditional.  Without the shades, it looks rather mid-century like the house is and it makes me happy.  This is the high quality pic from the listing that I saved onto my phone.

rh-light

It is missing the chain and the ceiling canopy, but those parts are easy to replace and I'll take a Restoration Hardware chandelier for $50 any day!

Back inside the house, I have thankfully banished the dingy cream/yellow from the living/dining windows and it's an instant facelift!  With the yellow gone, it feels exponentially cleaner.

w13-window

Almost all of the trim in the house was the same odd cream/yellow as the front door (which, trust me, is much more garish in person.  So much so that the roofing guy who came to quote the roof mocked it).  So this is my current debate.  Do I leave the existing front door, add a little trim to make it a bit more architectural, and simply paint it?  Potential color options range from a better yellow, to green, to a deep red.
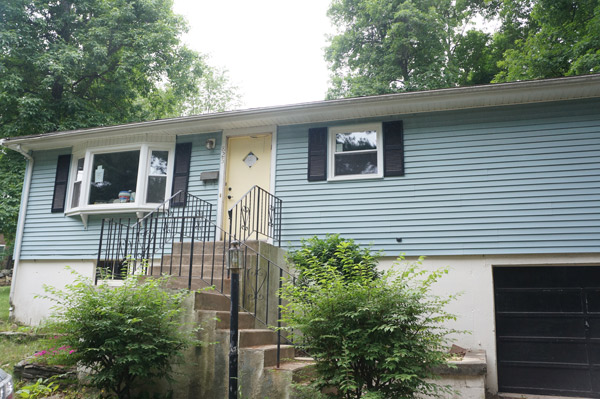
w13-original-door

Or do I switch it out entirely?

w13-hd-door

Apparently on home depot's app, you can hold up certain products and then take a pic with it in your space- I dig it.  I'd stain this door a medium tone, but keep it wood.  Hands down, I know the new door would look better, but I'm having a tough time justifying the cost of getting it installed.  The diamond door is just so dated (and not in the best shape), but I very much like getting a return on each element I put in the house and I'm not sure the ROI is there.  Thus is my internal debate.  I think I need to talk to my contractor a bit more before I can make an educated door decision.

So that is my enthralling Grover progress this week.  The staging over at Frankie is much more exciting, so I'll be taking photos of that today.  If someone doesn't want that house now they should have their heads checked!  Speaking objectively of course.

5 Ways to Quickly Update Furniture

Welcome to my new series "5 Ways"!  Once a month I'll be sharing 5 ways to do something, whether it be 5 ways to style a shelf, 5 ways to stage a house on a budget, 5 ways to make sure your husband doesn't divorce you due to all the furniture you hoard.  I'm not sure on the last one yet.  I only have one way- be cute and bat your eyelashes.  But I think you get the point of "5 ways".  If you have a topic you'd like for me to touch on, I'd love to hear it! Now, without further ado...

5 ways to quickly update furniture

1. Paint it

Painted restore dresser/island before and after

Didn't see that one coming, did you?  Paint can be the easiest way to update a piece without too much effort.  If repair isn't needed, sometimes a quick shot of spray paint can give a simple piece an instant refresh in less than an hour!

2. Switch out the hardware

IKEA kallax hack with updated hardware

A standard piece from IKEA suddenly becomes a whole lot less standard with vintage pulls.  A plain dresser can become so much more with the right jewelry!

3. Clean it up

restore-a-finish wood clean up

No, I don't always paint furniture.  Don't get me wrong, it happens rather often, but I do come across pieces that it would just be wrong to paint.  If your piece is in good shape but is just showing a bit of wear, it can be refreshed with furniture polish, rubbing walnuts on scratches (seriously), or my personal favorite- rubbing it with fine steel wool and Restore-a-finish.  It hydrates the wood, blends minor blemishes and helps the wood come back to life.

4.  Add an unexpected pop of color

mcm ombre dresser with unexpected pop of color

Oh how nice, an ombre dresser... BAM green and orange.  Maybe not the highest impact transformation, but its a bit of unexpected whimsy.  Think about adding color to the less obvious places- inside a cabinet, the side of a drawer or the back of a shelf.

5. Add some bling

gold dipped side table

Yes, I have a gold spray paint addiction.  No it's not a problem, I can quit any time... but who would want to??  Adding a bit of metallic to a piece adds instant glamour.  If your feeling gutsy, why not mix metallics?  They are all neutrals, after all!


Board & Batten Bathroom

Before I jump into the "Afters" of my board and batten, I wanted to share some minor restructuring around here.  Hopefully for the better.  I'll still be posting Mon/Wed/Friday, but now you'll know what to expect:  Mondays will be DIYs, Wednesdays will be a series post (craigslist, house crash, or one of a few new ones I have up my sleeve), and as always, Fridays will be flip days.  You may also find a rouge Tuesday or Thursday post in there if I find myself wanting to share off topic.  I think this new structure will help me to come up with even greater content! So I promised you Board and Batten part 2:  finished board and batten and you got it!

board-and-batten-5

When I left you in part 1 last week, I had all the wood pieces up and it was time to patch/caulk/paint, and generally make it look all polished and pretty.

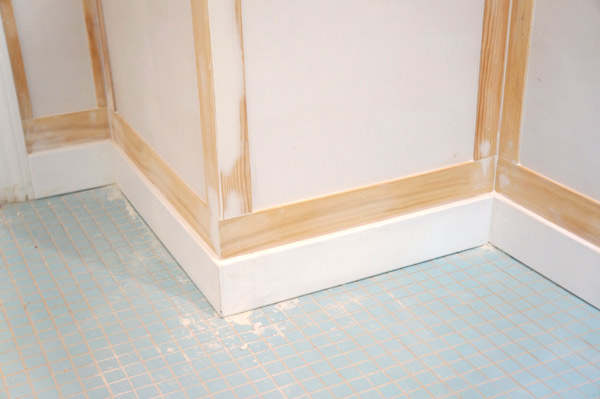
I started this by patching all of the nail holes and any outside corners that may not have lined up 100% with plaster patch.  I know I'm supposed to use wood filler, but for such small, non structural spots, I find the plaster patch so much easier to work with.

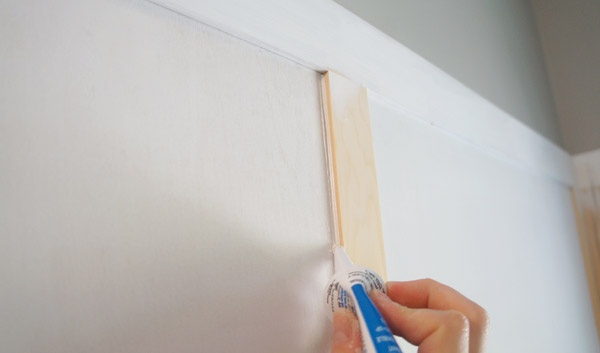
Next, I caulked every seam.  And I mean every.  single.  seam.  This is what makes a homeowner project look like a professional install.  Admittedly, caulking takes some practice.  The first time I tried to caulk my own bathtub, I had to scrape it back out and bribe Handy Dad to fix it for me.  Now on my 3rd flip, I think I finally have a handle on it, so I want to share my tricks.  I like to use the small squeezable tubes as opposed to a caulk gun- I feel more in control over the amount that comes out that way.  I pretty much try to squeeze out as little as possible that will still cover the seam.

bandb-caulk-bead

After I've squeezed out a bead of caulk, I wet my finger, then press it into the joint and wipe.

bandb-caulk-smooth

The water is crucial since it will help smooth everything and make it easier to clean the caulk off your finger.  I actually did this with a bucket of water next to me that I used for rinsing off my hands as I went as well as dunking my fingers to wipe the caulk joints.

Eventually a corner that used to look like this:

bandb-closeup

Looked like this:

bandb-corner-caulked

Next came the fun part, painting.  Fun.  Or something like that.  With all the joints caulked and holes patched, the paint is the icing on the cake.

bandb-corner-done

board-and-batten-3

board-and-batten-1

I'm so pleased with the way this came out!

board-and-batten-4

It's almost hard now to picture what the bathroom looked like when I bought the house.  Blue galore, and it felt SO TINY.

grover-before12

and now:

board-and-batten

I'm eager to stage it but it will have to wait until the rest of the house is complete and ready for staging.  There's dust still flying elsewhere in the house.  But trust me when I say that once this room is 100% complete and staged, it will be so pin-worthy!  I can't wait!

What do you think of the bathroom transformation?