Grover: Week 12

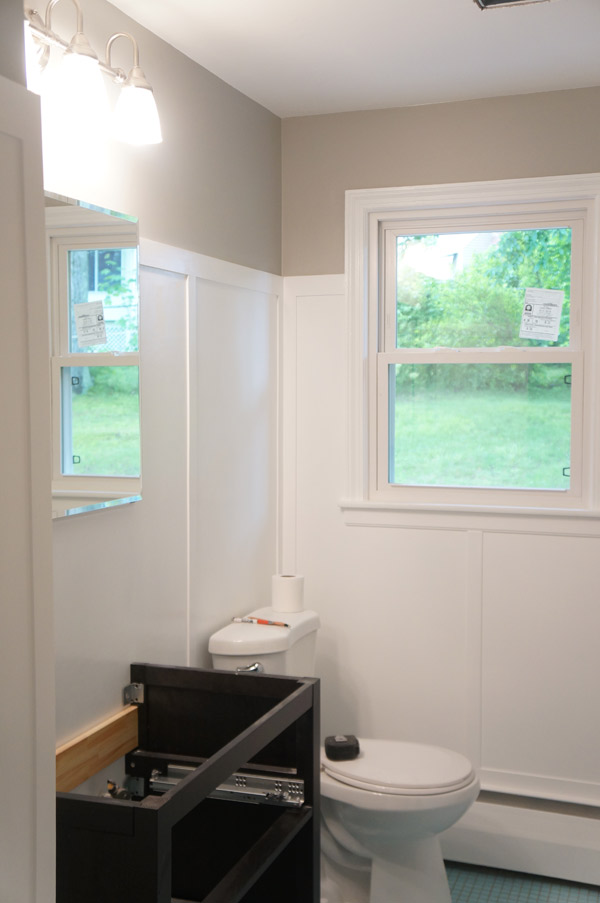
I hope you enjoy these weekly updates as I learn to navigate through the business of flipping houses.  Check out more about this flip, Grover, or check out posts about our last flip HERE. I always underestimate the time it takes to properly patch holes and caulk wood working projects so they look pretty and not home-made.  I can finally, however, proudly announce that all my major tasks in the bathroom are DONE!  I still have to finish painting the new bathroom closet door and install that, and the plumbing needs to get finished up (which I am smart enough not to touch myself).

w12-bathroom-walls

Look!  There's even a light fixture and a mirror!  I hear those are things that are usually in a bathroom.  You'd think there should be a sink in there too or something....

But that's not the only room that's been changing this week.  Let me give you a hint

w12-wood-pile

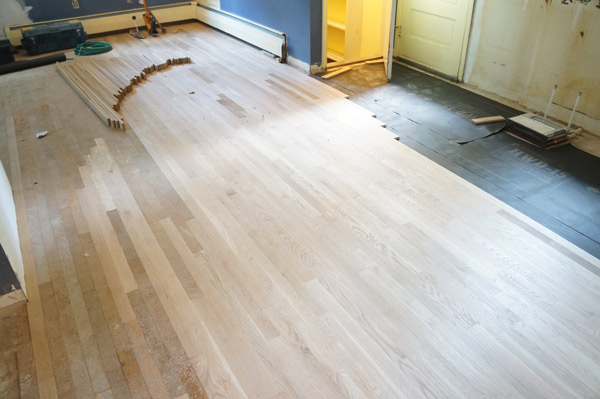
Sayonara stinky kitchen linoleum!

w12-kitchen-floor

w12-kitchen-floor2

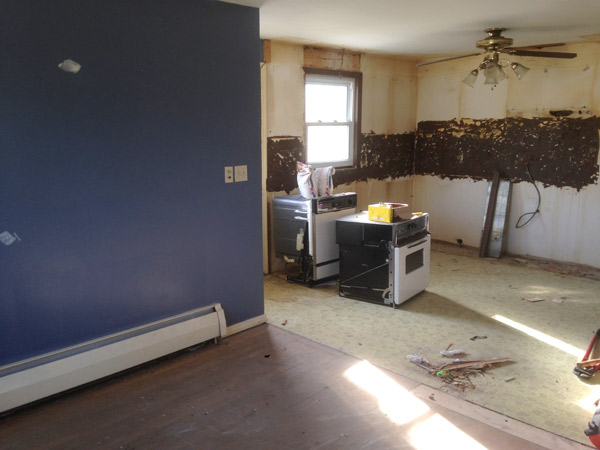
Here's a flash-back to the floors that were there at the beginning of the week.  Continuing the hard wood into the kitchen was the right plan.

w5-kitchen-dining

In the basement, the electrician's been busy too.  I keep forgetting to show you, but there's a shiny new electrical panel in the garage.

w12-elec-panel

I'm not looking forward to getting started in the basement.  Not only will sanding and painting this lovely paneling be a beast, now I have several holes to patch.

w12-elec-holes

Dear homeowners: please NEVER install your own wiring from a hidden junction box that you cover illegally with ugly paneling.  Your home will thank you.  And so will it's future owners.

On top of all that, I probably spent half of my week on craigslist.  In addition to staging furniture for Frankie, I'm heading out to pick up a Restoration Hardware chandelier for Grover's dining room for the paltry sum of $50!

Happy almost weekend!


Frankie Update

Frankie, oh Frankie.  Why must you break my heart so?  Frankie the Fliphouse (our second flip) still hasn't sold.  Great house on a good street on the wrong side of town.  Live and learn.  Without dropping the price yet again, we need to take action to get this guy gone! In the words of Sir Tim Gunn:

Make it Work print from Scoutmob

That saying's kinda a thing with Hubby and me.  I still need to frame this print that I purchased from ScoutMob and hang it properly, but I love the positive reminder.  I dare you to not hear Tim's voice when you read it!

Craigslist will be sick of me by the end of the next week or so- We've decided this house needs to be staged to help market it better.  I'm hunting, scavenging, and haggling for the best deals possible for furniture to stage an entire house.  That means mattresses, beds, dressers, etc.  I'm hoping to furnish the entire house quickly on a shoestring budget and make it look like it wasn't done on the cheap.  So far I've only set a time to pick up this guy on Saturday.

craigslist blue sofa

I know it's blue, but the style is pretty simple, it's clean and neat, and above all else, the price is right.  $50 for a sofa in good condition?  I'll take it!  Since I'm going blue on the sofa, I'm looking for a more neutral colored chair with interesting lines to accompany it.  Here are the current front-runners:

00q0q_86CMTHFkEFY_600x450 01515_7Jvkef2gyLP_600x450

Now the race is on to see who responds to my e-mails.

I'm sure I'll come up with a quick DIY or 2 to help stage once I get some of the larger pieces procured.  Until then, I'll be that girl on my iphone every 5 minutes looking to see if anything new has been posted.

Let the staging begin!

Board & Batten Beginnings

In an effort to make a would-be VERY VERY long post into just a very long post, I'm breaking up my Board and Batten tutorial into 2 parts.  Welcome to part 1! After ripping down the old, damaged, ugly blue wall tile in this latest flip, the bathroom walls were in sorry shape.

grover-w3-bathroom

Walls like that leave only 2 options: tear them down and start over, OR cover them up.  Last flip I went with the first option, so this flip I decided to have a bit more fun with woodworking.

The planning is the most time consuming, brain consuming, and tedious part with lots of math.  First I planned how high I wanted it.  There was no science to it- I knew I wanted it high to cover all the wall damage and picked a tile grout line to align it with so it didn't feel arbitrary.  It ended up somewhere around 6 feet, but as long as it looks good to the eye, the actual measurement doesn't matter.  If you look closely at the beautiful image below, you can see my horizontal planning pencil line.  I also made sure to plan out where I wanted my verticals to be- I wanted one at the mid-point of the mirror and divided the wall accordingly.

ugly bathroom walls

After a trip to Home Depot to look at my wood options, I decided to use 1/4" thick sheets of plywood for my 'boards' and lattice pieces for my 'battens'.  The formula that I decided on for the trim pieces was a base board topped with a 2 1/2" wide lattice piece.  The top would also be the 2 1/2" lattice with 1 3/4" lattice for the verticals.  Here comes the fun part- math!  Lots of measuring and figuring helped me determine how much I would need, then I bought a little extra in case of user error.  Not that that would ever happen....

I find projects like this to be a lot of fun in all seriousness.  It's like designing a puzzle, then building said puzzle, with the result being a pretty room.  I get to use my brains and brawn!

Once I brought all the wood home, I started with the plywood.  I cut it to size, then 'dry fit' it in the space.

board and batten dry-fit

Prior to install, I decided to prime the pieces, so that put off install for a bit while I waited for them to dry.

boar painting

A bit of construction adhesive and a finish nail gun is all that's needed to install.  I recommend painting the walls behind first too, in order to minimize touch-ups and detail painting.

board and batten install tools

Looking better already!

board and batten install progress

Next I installed the horizontal pieces starting with the base boards that I pre-painted.  I didn't want to have to try and cut in with paint at the floor, or any difficult areas, so I made the decision early on that any piece that would be touching wall, floor or tile would get painted before installing.

base paint

After the base and adjacent lattice horizontals, I installed the top trim being extra special careful to line it up with my intended grout line and to keep it level around the room.  I had levels of a few different sizes that I was using, but the best tool is your eyes-  level or not, it needs to LOOK right, so step back often and make sure nothing's looking wonky.

board and batten horizontals

Verticals next!

I measured each piece individually to make sure everything fit properly.  I'd say this part was the most happy-dance-inducing because as I installed the verticals, every last bit of ugly wall behind disappeared.

board and batten part one progress

As always, perfection with these steps is pretty much impossible (not that I don't try!!).  No house , not even a brand new one, is going to be totally level and square, so gaps are inevitable.

board and batten progress close-up

Luckily, caulk and paint are pretty much my best friends when it comes to wood-working projects.  To quote my grandfather: "caulk and paint make a carpenter where he ain't."

This is where I leave you with part 1... stay tuned for part 2 and near finished bathroom next Monday!!