

Millie: Week 6

millie-w6-dumpster.jpg

I hope you enjoy these weekly updates as I learn to navigate through the business of flipping houses.  This flip, Millie is the most challenging and most exciting yet! You can find more about this house and about my 3 previous flip houses here. At some point the mess in Millie will start getting less and start to look like a functional house again.  That point was not this week.

A dumpster for trash/demo debris was delivered yesterday, so in the days leading up, I used that as a reason to get all smashy and messy inside.  So much so that I've run out of smashy room until I totally load up the dumpster.  I've only loaded it with stuff from the yard and it's more full than anticipated.  Looks like I'll be playing dumpster tetris again.

millie-w6-dumpster

One of the larger items that I've been waiting for in the yard also happened this week- stump grinding!  I can just feel your excitement!

Once upon a time, the yard was lined with large evergreens that got damaged in an epic ice storm.  Instead of dealing with the entire tree, stumps and all, they chopped the trees down and landscaped around them, leaving me to deal with the stumps.  All 22 of them.  The pic below from last weeks progress highlights 12 of the 22.

millie-w6-stumps

Well, the stumps are no more!

millie-w6-no-stumps

The enthralling exodus of the stumps means that I can now finish landscaping as necessary.  I need to plant grass, do minor weeding (of the little guys that I ignored the first time around), and mulch.... a lot.

Inside the house is all about selective demolition.  Well, every room except the blue bathroom.  That is exclusive demolition.
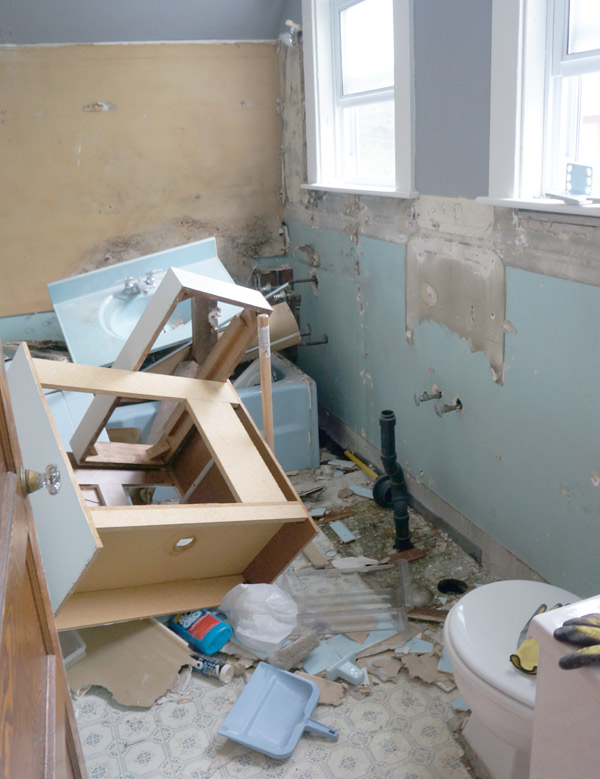
millie-w6-bathroom

I find it amusing that once I demo-ed the tile-covered drywall, I discovered that this bathroom did in fact originally have a wall hung sink.  Prior to this discovery, I also purchased a wall hung sink for in here (that I showed you in last weeks update).  What's old is new again, right?

Selective demo was the kitchen.  With plans to reuse the cabinet boxes, I had to carefully remove all the doors, and not so carefully remove a few 100 year old cabinet shelves to create an alcove that I'll be able to eventually tuck the fridge into.  It hurt me a little to mess with one of the original cabinets, but it's what needed to happen logically to the kitchen.  I'd rather have a layout that functions for a modern kitchen than a few old shelves.

millie-w6-kitchen

And if anyone is counting, I believe I'm up to 13 different wallpapers discovered so far in the house.  4 of which were in here..... and all were pink.  Apparently this room has been pink since its creation.  This pic was taken after 2 layers were peeled off.
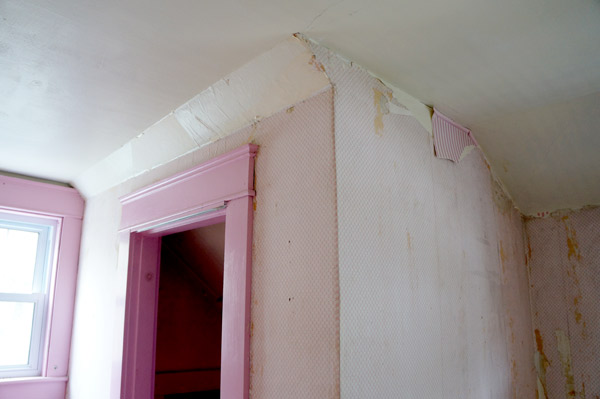
millie-w6-pink-room

You may have seen 3 of the 4 on my instagram this week.  The 4th was a pink gingham that I found only a few scraps of.
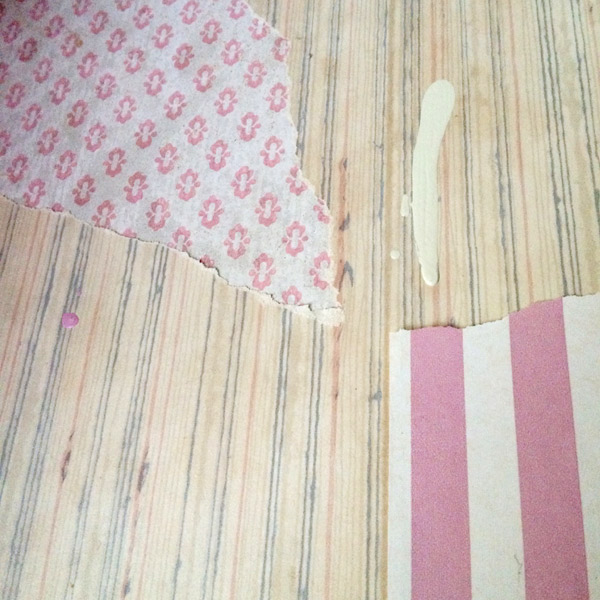
millie-w6-pink-wallpaper

My head was definitely in bathroom-mode this week, though.  More selective demo happened in the future master bath, as well as some layout planning.

millie-w6-future-bath

I removed the plate rail from in there which will be used to patch on the bedroom side once we close in the wall for the new pocket door.  Yes, there are 4 windows in the bathroom, and yes, I plan to frost them so the neighbors don't get a free show.  In addition to the layout planning, lots of plumbing fixtures were ordered for both baths.  2 claw foot shower rods and hardware were ordered which means that the new master will be getting a claw foot shower as well.  The visual side of me screams NONONO, but the functional side of me concedes to the fact that people want to take a shower in their bathroom.  Silly people.

Millie the fliphouse plumbing fixtures

1/2/3/4/5

Other exciting stuff like rotten exterior trim repair and stripping paint from a claw foot tub also happened this week.  Not as pretty as shiny faucets, though.  Plans for the coming week include more exterior paint prep (yay!), more dumpster filling, more demo, more paint stripping, and more planning.  This house will be a stunner eventually!

5 Ways to Make a Room Bigger

I live in a small house.  It's perfect for Hubby and I, but it's small.  One of the keys to living large in a small space is making the most of the space you have.  But HOW?  I'm so glad you asked. 5-ways-to-make-a-room-look-bigger

**As always, please pin responsibly and from the original sources that I have linked to.  Muchos gracias!!**

1. Clear the clutter!  What what??  I know, revolutionary statement here!  The less visual clutter you have, the bigger the space will look for several reasons.  If your eye gets stuck on the piles of mail on the coffee table, you'll never notice the 12 foot ceiling.  Aside from distracting from positive features of your space, clutter will also make it feel like you have storage issues (and maybe you do, but who wants to be reminded of them).  I personally live by the old adage "a place for everything"... still working on the "everything in its place" part, though.  My point is- if you have a place for things, it won't look like you have run out of storage space.  It's a wonder what some good organization can do!

kitchen-reveal3


2. Scale furniture appropriately.  Just because you can technically fit a sectional in your tiny living room doesn't mean you should.  Try replacing the love seat side of the sectional with 2 slipper chairs.  Not only will they feel more appropriate to the space, but they'll provide you with more flexibility.

mcgill-design-portfolio-rathnelly-04

image via McGill Design Group


3. Taking another lesson from the image above- show off those legs.  If you raise pieces off the floor even by a few inches, it gives the illusion of more floor space.  If you can see more rug, the room must be bigger, right?

Hranowsky2011_1_JLynn1888

image via Angie Hranowsky


4. Make use of vertical space just like the image above and my built-in in my own living room.  Using vertical space not only gives you more of this coveted thing called storage, but it also draws the eye up, once again making it feel larger.

living-room-sketch-reality

This guideline is the reason that soffits above kitchen cabinets drive the bejeezus out of me.  Not only is it wasted space most of the time, but it's a missed opportunity for a more dynamic room.


One of my most important tips:

5. High and wide!  Here, let me jump onto my soapbox for a sec.  Repeat after me: high and wide.  If I haven't spewed to you about where you should hang curtains yet, let me now:  HIGH AND WIDE!

march-033

I couldn't have said it better than Erin Gate's Curtain PSA (also the source of the image).  If it's not screaming at you from this pic, hanging your curtains high and wide will draw the eye up, make your windows look larger and grander, AND allow in more light.  If you like small, dark, unremarkable rooms, by all means, hang your curtains on the window frame. If you've made this mistake in the past, it's not too late to change!  Your room will thank you! *steps off soapbox*


Would you add any items to this list?  How have you made your space feel bigger?


Fly Away

This past weekend, I had the joy of being asked to do a DIY demo at my local Habitat for Humanity ReStore's "Fall for All" event.  As soon as they asked, I had a spark of an idea.  I've been wanting to try my hand at some 3d cut paper butterfly art for my future niece's nursery and the event would be a perfect practice.  For all those visiting because we met at the ReStore, WELCOME! DIY cut 3d butterfly art via Year of Serendipity

I swear, it is so much easier than it looks!  I was able to put one together in 2 hours at my Demo table at the ReStore.  All it takes is a frame, some paper, and some exacto knife skills.

After my demo, I recreated the art for my soon-to-be niece's room.  I started with an empty frame from, you guessed it, the ReStore, a piece of thick watercolor paper, a piece of thick chip board or thin cardboard for the backing, and one curious kitten.  (no kittens were harmed in the making of this art)

DIY cut 3d butterfly art supplies via Year of Serendipity

After cutting the 2 pieces to fit within the frame, it was time to get messy!  I chose to layer some rice paper onto the backing with Mod Podge to add a pop of color to the background.  Painting the backing piece would have the same effect, but I had some rice paper on hand and an idea in my head.  Don't you worry, it'll dry clear!

DIY cut 3d butterfly art backer via Year of Serendipity

Once you have the backing covered, set that aside to dry for a while.  Now on to the butterflies!!

The prep step that I'm not showing you was figuring out a few butterfly shapes.  They could totally be drawn freehand, but I thought it would be easier to create a template.  Using a scrap of paper folded in half, I played around with butterfly shapes and sizes until I had 8 of varied sized that I thought could work.  I traced them onto scrap cardboard from the recycle bin and cut the butterflies out with an exacto.  Thus a template was born!  If you ask really nicely, maybe I'll scan it in and make a printable template available.

DIY cut 3d butterfly art process via Year of Serendipity

Next, on your watercolor paper, figure out a flight path for your butterflies.  I decided I wanted to start small in the corner and fan them out at the top.  I drew to guide lines for the general shape planned, then started tracing butterflies willy nilly.  Go crazy!  Fill up your paper!

DIY cut 3d butterfly art process via Year of Serendipity

Just make sure to leave about a half inch around the outside for your frame and don't allow your butterflies to touch or overlap.  While tracing my templates, I made sure to leave a space between the 2 halves of the butterfly.  This is an important step when you're cutting since you want to leave a gap where the butterfly body would normally be.  I tried to bump up the contrast on this one so you could see my light handed butterflies, but the color got a bit wonky.

DIY cut 3d butterfly art process via Year of Serendipity

Once you have your butterflies all drawn out, break out an exacto knife with a new, sharp blade.  Sharp blades make cutting much easier, so I'd be sure have a few on hand.  This part is not as challenging as it looks, I promise!

DIY cut 3d butterfly art process via Year of Serendipity

Go slow, be careful, rotate your paper as necessary to get the best angle, and make sure to leave a gap between each butterfly's wings.  This 'body gap' is what allows you to fold out the wings.  The best part about this is you don't have to be exact!  If you don't follow your lines precisely, it doesn't matter, as long as it still resembles a butterfly wing.

DIY cut 3d butterfly art process via Year of Serendipity

Be prepared to spend a bit of time on this step- although it doesn't take hours, its the longest part of the process.

After all of your butterflies have been cut, you have 2 options: take an eraser and erase all of your pencil lines or flip your paper over and use the back as the front.  I chose to erase since I had some patches on the back where I overcut a few of my fliers (oops).  If taking the erasing route, I recommend holding down the wings as you erase so they don't get crunched up by an overzealous eraser.

DIY cut 3d butterfly art process via Year of Serendipity

Now it's time to make them fly!  Carefully peel up each wing and crease it at the body.

DIY cut 3d butterfly art process via Year of Serendipity

Repeat until all your wings are taking flight.

DIY cut 3d butterfly art via Year of Serendipity

Bring back your backer piece which should be totally dry by this point.  I decided to use Mod Podge again to adhere my butterflies to the backing.  Spread a THIN layer, wait for a few moments until its a bit tacky and not totally wet, and carefully place your cut paper over the backing.  If the glue is too wet, it'll warp your paper... trust me, I've learned from experience...

DIY cut 3d butterfly art backer via Year of Serendipity

Once aligned, run your finger between the butterflies to make sure that the negative space sticks down and your wings stay flying free.

DIY cut 3d butterfly art process via Year of Serendipity

While it's drying, you can take this opportunity to put it in the frame (make sure if you're using a frame that has glass in it, remove the glass since it will just flatten your flying friends).  Since I was using an empty frame, I used framing points to hold the art in the frame.

All that's left is to hang and admire!

DIY cut 3d butterfly art via Year of Serendipity

DIY cut 3d butterfly art via Year of Serendipity

It even earned the kitten stamp of approval (which naturally is indifference, but I'll take it!)

DIY cut 3d butterfly art via Year of Serendipity

What I love about this project is that it's so customizable.  Want to make it smaller or bigger?  No problem!  Want to make your butterflies into a letter?  Go for it!  Whatever way you want, they butterflies will be dynamic and playful, but still the right amount of elegance.

So, what do you think?  The perfect addition to a little girl's nursery?