Dori the Flip House: week 2

I hope you enjoy these weekly updates as I learn to navigate through the business of flipping houses.  My latest flip house, Dori sports the 3 L’s in real estate, but will need more than a bit of creativity to make the house sellable. You can find more about this house and about my 4 previous flip houses here. I didn't get the demo finished this week like I hoped, however things are moving along nicely.  I'm really not in too much of a rush currently, because not much can happen in the next 2 weeks as we wait for the building permit to come through and the windows that were ordered to come in.  I'm crossing my fingers that we'll have the permit in hand when the windows come in and we can jump on that.  Once windows happen, everything else can and the line of dominos can start falling.

So until then, I smashed more,

Dori the flip house week 2 demo

and opened up the kitchen to the living room a bit,

Dori the flip house week 2 demo

and loaded about a kagillion loads of demo debris into the dumpster,

Dori the flip house week 2 demo

and mowed the large lawn (just the front pictured), all the while thankful that my own lawn is essentially a postage stamp,

Dori the flip house week 2 lawn

and figured out a MUCH needed plan for some curb appeal (hint: it includes stained shutters and a blue door- image via Young House Love),

Young House Love Blue Door

and got multiple landscaping quotes, and planned out the kitchen, and ordered appliances with the holiday sales, and ordered light fixtures for almost the entire house.

Dori the flip house week 2 planned lights

(1- Hyannis Wall Lantern for outside, 2- Nimbo Flushmount for the kitchen,3- Octagon Flushmount for the bedrooms)

My plan is to have everything purchased in the next few weeks so when install begins it can go full force.  If this flip house goes according to plan (fingers crossed) once stuff starts happening, everything will start happening.  Windows will lead to drywall which will lead to painting and tiling which will lead to kitchen and bath install and then flooring, staging, and selling.  That's the plan at least!

Antique Newel In Progress

I feel like I'm juggling 2 jobs right now- the flip and our own house reno which is seemingly never ending (aren't they always?).  Luckily we are able to function in our house now, but shockingly (or not) my 'little' floor refinish project has snowballed.  Aside from needing new baseboards with the new floors and replacing the railing on the newly finished stairs, I'm using the floors as an excuse to fix a lot of my annoyances with the house- one BIG project instead of ten thousand little ones- makes sense, right?  RIGHT?? The next big step in the project is the stair railing.  This needs to happen asap so Hubby and I don't take a header down the steep steps.  Before that can happen, however, these antique newel posts that I picked up need to be rejuvenated.

antique newel posts before

Aside from the degraded finish, I needed to patch several holes from old hand rails and these suckers needed to be about a foot taller.  People were apparently shorter 100 years ago... or didn't mind having low handrails.

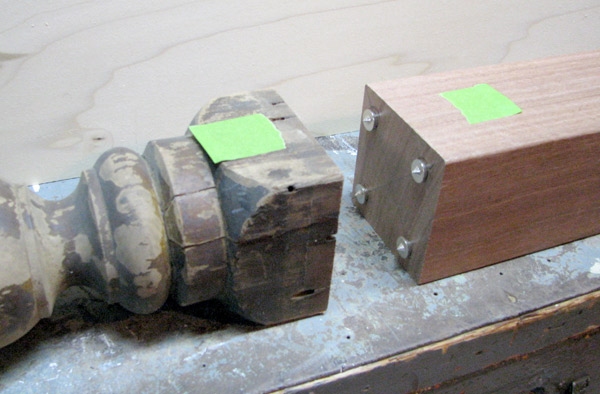
Handy Dad helped me to tackle the height issue and we devised a plan to marry the existing post with a mahogany 4x4.

First we cut down the bottom of the newel posts so we had a flat surface to attach the 4x4 to.

antique newel posts trimmed

Then, Handy Dad took over and doweled the newel post and the 4x4 together.  Essentially he drilled holes on one piece, then used transfer points to mark the other piece.

antique newel posts progress

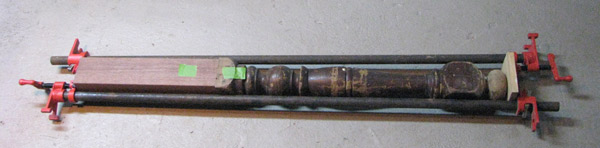
Insert wooden dowels, wood glue, and clamp.

antique newel posts progress

Once the glue was dry, it was time for me to patch and sand my butt off.  I cut filler pieces out of the scrap we had from trimming the bases and glued them into the old slots- one on one railing and two on the other.

antique newel posts progress

And then sand for what seems like forever.  I started with a low grit and worked my way up to 220.

antique newel posts progress I would LOVE to be able to stain these newel posts and the railing to match, but sadly with all this patching regular stain is not an option.  Never fear, I have a plan!

While a solid stain alone would look flat and like I just painted the posts, a solid stain with a slightly darker stain/poly mix over it just might add the dimension that I'm hoping for.  Please disregard the ribs in the wood itself below- I was using the back of a floor board from my scrap wood pile.

antique newel posts color test

And since this is where I currently stand, this is where I leave you for today.

Will I be able to make these old newel posts look good?  Will my experimental finish work?  Stay tuned next week for the thrilling newel post conclusion!

Dori the Flip House w1

I hope you enjoy these weekly updates as I learn to navigate through the business of flipping houses.  My latest flip house, Dori sports the 3 L's in real estate, but will need more than a bit of creativity to make the house sellable. You can find more about this house and about my 4 previous flip houses here. So this week I deconstructed. A lot.  And by deconstructed I do mean smashed.  And made a big mess.

Dori Flip House Demo

It turns out that the previous owners were masters at covering up issues.  If you can't see it, it doesn't exist, right?  Like termite damage.  It doesn't exist if you put paneling over in and a new toe kick on the cabinet they completely feasted through....  Luckily for me, it's not active and they dined on one cabinet and paper wallboard only, leaving the studs completely alone, but I'm treating it anyway. No bandaid fixes for this flipper.

Dori Flip House Demo termite damage

Tell me this wasn't a bit creepy to find behind paneling:

Dori Flip House Demo

But on a less creepy note- the kitchen has bid us adieu and my new plans are coming together nicely.

Dori Flip House Demo Kitchen

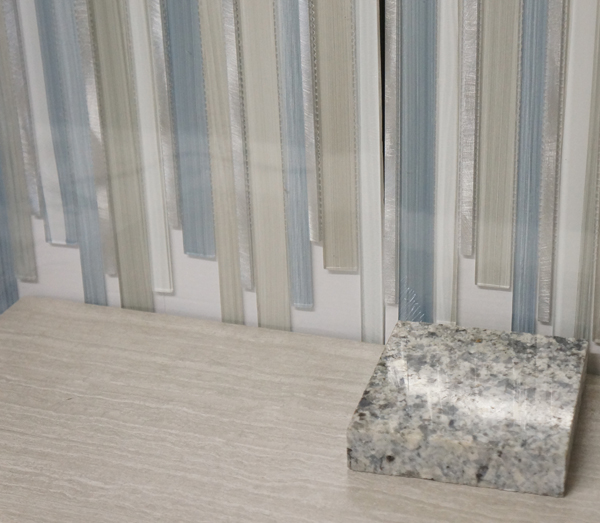
I'm going for a completely different feel here than the other houses.  My goal here is funky condo alternative.  I won't even be using my go to subway tiles.

Dori Flip House Prelim Kitchen Plan

The most tedious thing so far has been getting rid of the darn brick veneer wall.  They used some good adhesive because I had to tear that sucker down brick by flippin brick.

Dori Flip House Demo Brick

I'm hoping that by the end of next week, all the interior deconstruction can be DONE.  2 weeks of demo would far surpass Millie's 2+ months of demo.  I'm eager for this house to be a blank slate (and stop being an assault on my olfactory senses) so I can start rebuilding!